This article covers how to use Index Manager in the >Web Hosting cPanel dashboard to allow you to control how directories are indexed and presented on your website. This feature improves user experience, strengthens security, and provides better management control for both site administrators and visitors.
By default, if a directory lacks an index file, its contents will be listed for users to view in their browser. This setting can be adjusted using the Index Manager to customise how directory listings are handled.
TABLE OF CONTENTS
How to Use Index Manager in cPanel
This tutorial assumes you have a web hosting plan with Domains.co.za and have already logged into cPanel.
1. Navigate to the Advanced section of cPanel. Indexes should be there. Click it to proceed.

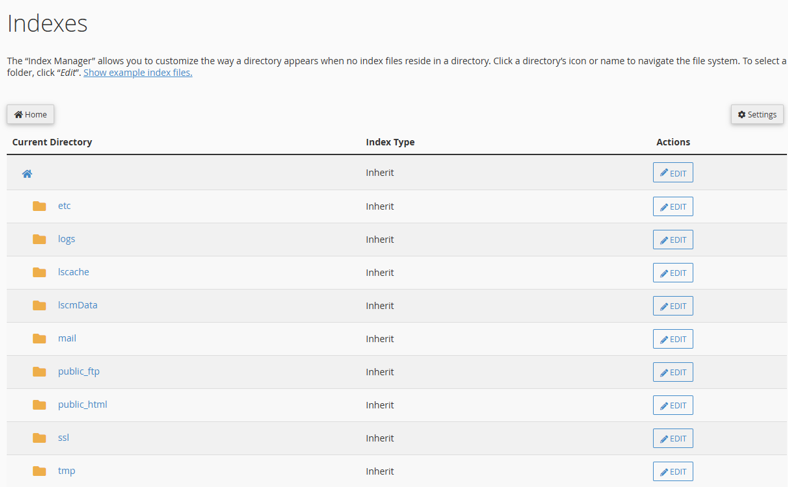
2. From the Index Manager home screen, you will be able to view a list of directories.

How to Edit Index Manager
3. Click Edit next to the directory where you wish to modify the index settings.

Customise Index Manager
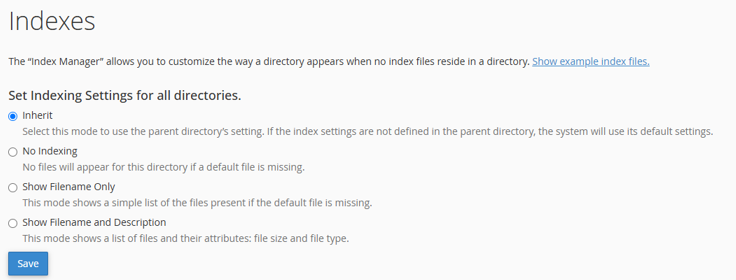
4. Select an Index Option by setting one of the following options for any directory:
- Inherit: The setting of the parent directory is used in this option. The system will use its default settings if the index settings are not defined in the parent directory.
- No Indexing: Specifies that a directory listing (with no files displayed) will not be shown in the absence of an index file.
- Show Filename Only: Displays a simple list of files present if the default file is missing.
- Show Filename & Description: Shows a list of files along with their attributes (file size and type).
5. After selecting the desired indexing option, click Save, and the new setting should take effect immediately.
NOTE:
If any index file (e.g., index.php, index.htm, or index.html) exists in a directory, the user will see that index file regardless of the indexing option set for the directory.
Additional Information
Benefits of Using cPanel Index Manager
The Index Manager feature in cPanel offers several advantages for managing how directories are indexed and displayed on your website:
Enhancing Website Security: By setting directories to No Indexing, you can restrict unauthorised access to sensitive directory contents, adding an extra layer of security to your website.
Customising Directory Listings: The Index Manager allows you to tailor the appearance of directory listings. This customisation can include adding information or changing the display style to align with your website’s design, creating a more cohesive user experience.
Improving User Experience: Adjusting directory indexing settings can significantly enhance the experience for your website visitors. For instance, you can configure default index pages to automatically appear when someone navigates to a directory, making it easier for them to find what they’re looking for.
Managing Content Distribution: If you have directories containing files you wish to share, the Index Manager allows you to control how these files are presented. You can opt to display a list of files or provide direct download links, making content distribution more efficient.
Compliance with Regulations: In some cases, regulatory or organisational policies may dictate specific requirements for content access and display. The Index Manager enables you to configure directory indexing settings to ensure compliance with these guidelines.
Login to Domains.co.za Account
1. Go to the Domains.co.za Login website page.

2. Enter your Email and Password and click the “Sign In” button.
3. You will see the Domains.co.za Dashboard, displaying the Manage Account menu on the left and your Account Information, Account Overview and Open Support Tickets on the right.

Login to cPanel from your Domains.co.za Dashboard
4. Click on Manage Services to view the sub-dropdown menu and select the hosting package for the domain you want to work with – in our example we are using Web Hosting.

5. Click the Manage button to the right of the domain name you want to access.
6. The display will now show Product Information, Quick Manage, Resource Usage and Site Statistics for that domain name.

7. Under Product Information, scroll down to Control Panel, which will display cPanel to the right, and click on the Login button.

8. The cPanel Dashboard will now be displayed.


