WP Toolkit for cPanel is a powerful, all-in-one management interface for WordPress. It simplifies tasks such as installing, configuring, updating, and securing WordPress sites, all from a central dashboard. This guide will show you how to use WPToolkit for cPanel, available in our WordPress Hosting plans, to help you manage all your WordPress websites quickly and efficiently without needing advanced technical knowledge.
TABLE OF CONTENTS
How to Use WP Toolkit for cPanel
This article assumes that you have already logged into cPanel from your Domains.co.za Account.
1. From your cPanel Dashboard, scroll down to Software and click WordPress Manager by Softaculous.

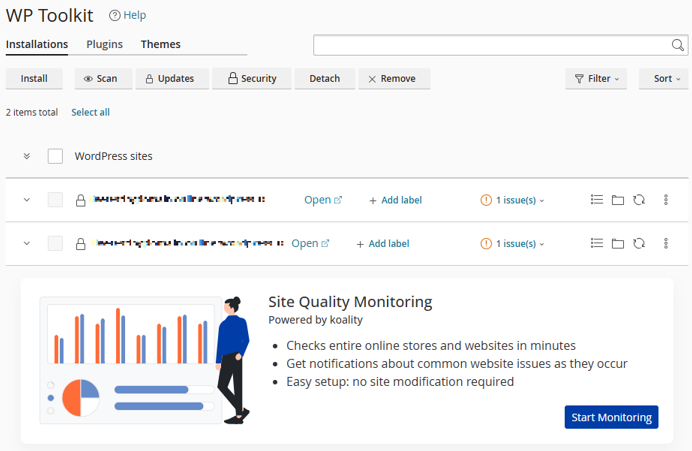
2. View your existing WordPress installations (websites) on the next page.
3. Each site will display details like version, themes, plugins, and status.

To Install WordPress Using the WP Toolkit for cPanel
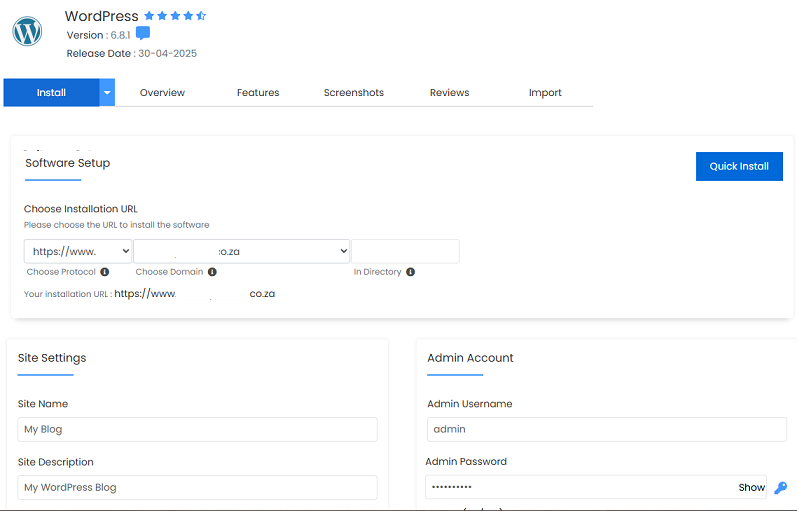
1. Find the WordPress software in the Softaculous app library and click Install.

2. Under Software Setup, select the domain’s Protocol and Directory
3. Under Site Settings – complete the fields Site Name and Site Description
4. Complete the Admin Username and Admin Password for the Admin Account – save in a password manager for the new site.
5. Click Install again to complete the setup.
Manage Existing WordPress Sites
1. Use the options next to each installation to update WordPress, themes, or plugins.
2. You can also enable maintenance mode, back up the site, clone it, or configure security.
3. Click Plugins or Themes to install or manage these directly from the WP Toolkit.
Additional Information
WPToolkit for cPanel Features
- One-Click Installation: WP Toolkit simplifies WordPress setup by automating installation and configuration steps.
- Centralised Management: Manage all your WordPress sites from one dashboard; there’s no need to log into each admin panel.
- Cloning & Staging: Easily clone sites for testing or create a staging environment to test updates safely.
- Plugin & Theme Control: Install, activate, deactivate, and delete plugins or themes in bulk.
- Automatic Updates: Schedule or manually apply updates to core files, themes, and plugins.
- Security Hardening: Apply recommended security measures such as disabling file editing and blocking XML-RPC.
- Back up & Restore: Take backups before applying changes and restore if something goes wrong.
- Maintenance Mode: Enable with a single click when you’re performing updates or site changes.
- SSL Support: Install SSL certificates directly within WP Toolkit for HTTPS support.
- User-Friendly Interface: WP Toolkit is designed for beginners and developers, making WordPress management seamless.
- Perfect for Agencies: Great for freelancers or agencies managing multiple client WordPress sites on the same server.
- No Code Required: Ideal for non-technical users who want to manage WordPress without FTP or terminal access.
- Smart Updates: (Premium Feature) Compares the site before and after an update to automatically avoid issues.
Login to Domains.co.za Account
1. Go to the Domains.co.za Login website page.

2. Enter your Email and Password and click the “Sign In” button.
3. You will see the Domains.co.za Dashboard, displaying the Manage Account menu on the left and your Account Information, Account Overview and Open Support Tickets on the right.

Login to cPanel from your Domains.co.za Dashboard
4. Click on Manage Services to view the sub-dropdown menu and select the hosting package for the domain you want to work with – in our example we are using Web Hosting.

5. Click the Manage button to the right of the domain name you want to access.
6. The display will now show Product Information, Quick Manage, Resource Usage and Site Statistics for that domain name.

7. Under Product Information, scroll down to Control Panel, which will display cPanel to the right, and click on the Login button.

8. The cPanel Dashboard will now be displayed.
Login to WordPress via cPanel
9. Scroll down until you get to Popular Applications, click on the WordPress icon.

10. The WordPress Dashboard will now be displayed.


