


The WordPress Admin Dashboard Is Where Website Management Really Begins
Once your website goes live, the WordPress admin dashboard becomes the place where the real work happens. The design is complete, but running the site is just getting started, and most of that day-to-day work is handled there. It’s where you publish content, adjust your design, add users, change settings, and keep your site safe.
This WordPress dashboard tutorial is for small business owners, bloggers, marketers, agencies, freelancers, and newbies who wish to explore. You won’t need to write any code to follow it.
You learn how to login and find your way around, then manage the everyday jobs: posts, pages, media, themes, menus, plugins, and user roles. We also discuss how to keep your site secure and fix common dashboard problems.
KEY TAKEAWAYS
- WordPress admin dashboard is your site’s control centre for everything behind the scenes.
- Login by adding /wp-admin to your domain.
- Posts are for dated content; pages are for fixed content.
- Limit Administrator access and give each person the lowest role they need.
- Keep plugins few, trusted, and updated.
- Block themes use the Site Editor; classic themes use the Customiser.
- Strong passwords, two-factor authentication, and regular backups are essential.
- Limit dashboard access to keep personal data safe and POPIA-aligned.
- Call in support for lockouts, critical errors, or security concerns.
TABLE OF CONTENTS
What Is the WordPress Admin Dashboard?
The WordPress admin dashboard is the back-end control area of your website. Some people call it WP Admin, WordPress Admin Area, or the WordPress admin panel, but they all mean the same thing: the private workspace where you run your site from.
Almost everything is managed from here. This covers your content and design, the users who help you, and your core settings. It’s also where you install plugins, upload media, run updates, and handle general maintenance.
NOTE:
This area is separate from what your visitors see. They only ever view your finished front end, while wp admin stays behind the scenes for you.
Why Understanding WP Admin Matters
When you know your way around the WordPress admin dashboard, you can:
- Save real time and money.
- Publish a page or post in minutes instead of waiting on someone else.
- Fix small issues yourself.
- Keep your details updated.
- Stay on top of security.
This matters most when you’re running a business. You don’t need a developer every time to update your opening hours, add a promotion, or list a new product. The more confident you are with it, the less you spend on routine changes, and the quicker your site keeps pace with your business.
How to Access WordPress Admin Dashboard
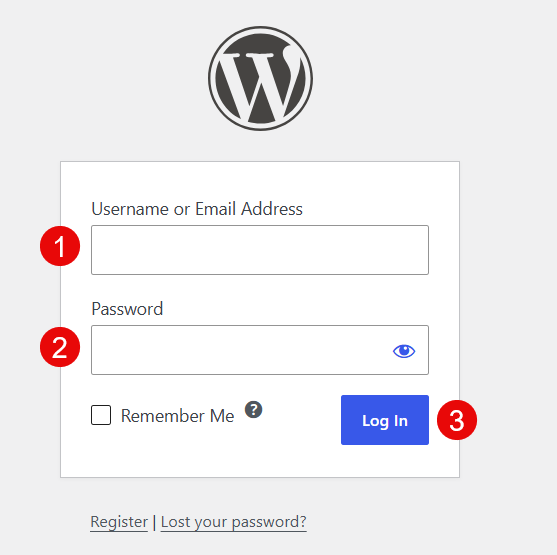
Getting into your dashboard is fast once you know the web address. Here’s the standard WordPress dashboard login:
- Type your domain into your browser and add /wp-admin at the end, for example:
yourdomain.co.za/wp-admin- Press Enter, and the login screen appears.
- Enter your username or email address, then your password.
- Click Log In to open the dashboard.
There’s also a direct route. Adding /wp-login.php after your domain takes you to the same screen, so use whichever you find easier to remember.
Some sites don’t use /wp-admin at all. The address may have been changed to a custom value, usually by a security plugin or a host setting. If your login page won’t load at the usual spot, that’s often the reason, so check with whoever set up the site.
IMPORTANT:
When you change or hide the login URL, you give attackers a small extra hurdle. Remember, it’s just a minor step, not a security plan. We cover the measures that genuinely keep the WordPress admin area safe later in this guide.
What to Do If You Forget Your WordPress Password
Locked out? Don’t worry, WordPress has a built-in reset.
Here’s how to get back in:
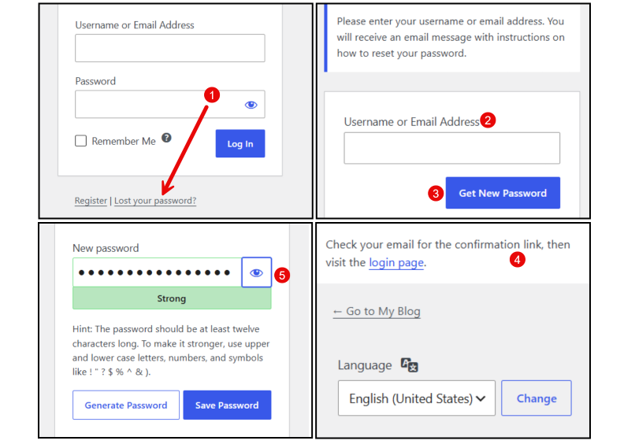
- On the login screen, click Lost your password?
- Enter the email address linked to your account.
- Click Get New Password.
- Open the reset link WordPress sends to your inbox.
- Set a new password and click Save Password.
- Finally, go to the WordPress login link and sign in.
The reset email is sent to the address on your account, so use that one. If it doesn’t arrive within a few minutes, check your spam or junk folder before trying again.
Sometimes you can’t reach that email account at all. When that happens, the password can be reset at the database level through phpMyAdmin. This is an advanced step with real room for error, so it’s best handed over to a developer or your hosting support rather than attempting on your own.
What You See When You First Login
The first screen you land on is the dashboard home. It greets you with a set of default boxes called widgets, each providing a quick summary of your site. You can rearrange or hide these later using Screen Options, which we cover shortly.

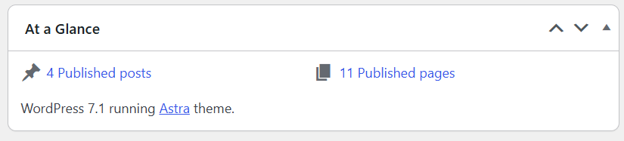
At a Glance
This widget provides a fast overview of your site. It shows how many posts, pages, and comments you have, along with the theme you’re running and your current WordPress version.
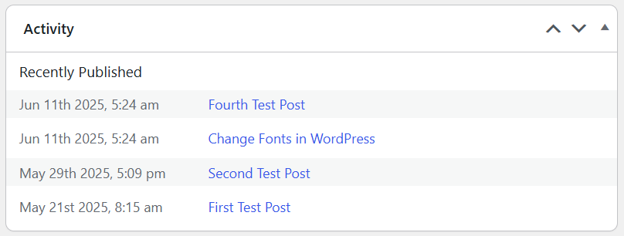
Activity
Activity keeps you in the loop at a glance. It lists your most recent posts and the latest comments, so you can see what has just gone live and what may need a response.
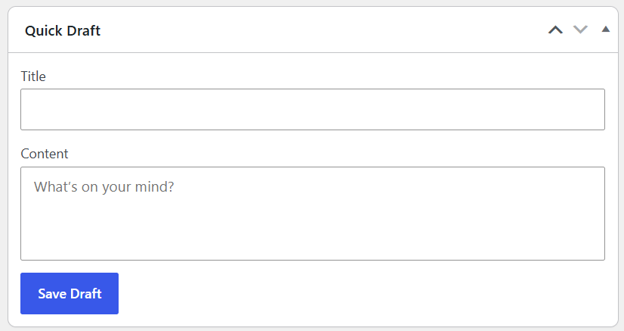
Quick Draft
Got an idea you don’t want to lose? This widget allows you to jot down a title and a few notes, then save it as a draft. You do this all without leaving the dashboard.
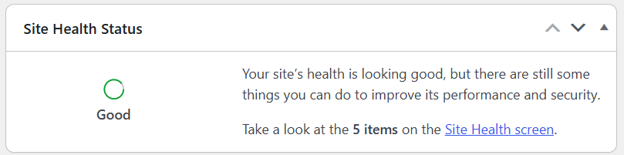
Site Health Status
This points out ways to improve your site’s performance and security. Treat it as useful guidance, not a full audit. A green result is reassuring, but it doesn’t replace proper security measures and backups.
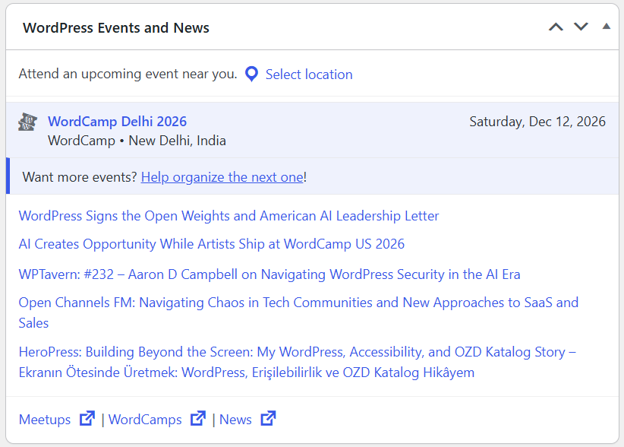
WordPress Events & News
This box shares news and nearby events from the wider WordPress community. It’s a simple way to stay informed about the software, and you can hide it if you’d rather not see it.
Customising Your Dashboard Workspace
The default layout won’t suit everyone, and that’s fine, because you can shape it around how you work.
Here’s how:
- Click Screen Options in the top right of the dashboard.
- Tick or untick widgets to show or hide them.
- Drag any widget by its title bar to reorder the layout.
- Collapse the ones you rarely open by clicking their title.
This is a great help if the dashboard seems busy at first. Hiding what you don’t use and keeping your key boxes at the top provides a cleaner, calmer workspace to manage your site from.

Getting Around WordPress Admin Area
The left-hand sidebar is your main map of the WordPress admin area. Every major section is located here, from Posts and Pages to Media, Appearance, Plugins, Users, Settings, and Tools. Click any item to open it and hover to reveal its sub-options.
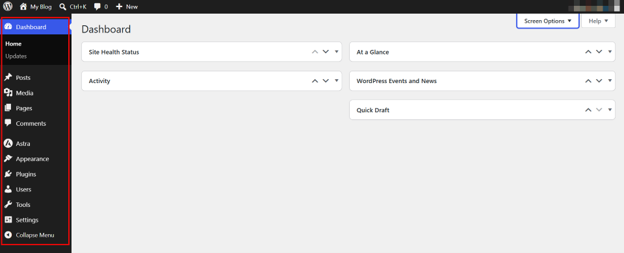
One thing that surprises new users is that the menu increases in size over time. When you add a theme or plugin, it can add its own items to the sidebar for items such as SEO, security, or a page builder. So, if you spot new options appearing after an install, that’s normal. Don’t panic.
Posts vs Pages: What’s the Difference?
WordPress provides two main ways to publish and mixing them up is a common early trip-up. The difference is simple once you see it.
- Posts are dated, categorised content that flows in a stream. They are built for anything that’s published regularly, such as blog articles, news, and promotions.
- Pages are static content that tends to stay put. They suit the fixed parts of your site, from your About and Contact pages to Services and landing pages.
Here’s a quick side-by-side:
| Post | Pages | |
| Purpose | Timely, regular updates | Fixed, standing information |
| Dating | Shown in date order, newest first | No date, sits on its own |
| Categories and Tags | Yes, to sort and group | No, kept simple |
| Typical Examples | Blog articles, news, promotions | About, Contact, Services, landing pages |
Manage Posts
Posts are where most of your regular content is located, so this is a screen you use often.
Here’s how to publish one:
- Go to Posts → Add Post.
- Add a title, then write your content in the main editor.
- Under Block attribute, format as you go:
- Style your text.
- Add headings.
- Drop in links.
- Choose the right font.
- Insert images.
- Assign a category and a few tags on the right, so the post is easy to find and group. You can do this under Post attributes.
- Click Preview to check how it will look on your live site.
- Hit Publish to make it live or Save Draft to complete it later.
WordPress autosaves your work as you type, so a dropped connection or a load-shedding outage won’t wipe out your draft.

To handle content you’ve already published, navigate to Posts → All Posts.
From that list, you can:
- Click Edit to edit a post in full.
- Use Quick Edit for small tweaks.
- Click Bin to delete anything you no longer need.

Managing Pages
Pages hold the fixed parts of your site, and they are just as simple to create:
- Go to Pages → Add Page.
- Add a title, then add your content in the editor.
- If your theme offers layouts, choose one under Page attributes on the right.
- Customise the content using Block attributes.
- Click Publish to take the page live.
Not every theme includes page templates, so don’t worry if you don’t see that option.

Pages tend to need updating rather than replacing. When your prices change, or you add a new offering, open Pages → All Pages, and edit your page in place. The same goes for keeping contact details and opening hours updated, so visitors always find the correct information.

Manage Media Files
The Media Library is your site’s single store for images, videos, and documents. Anything you upload lives here, and you can reuse the same file across as many posts and pages as you need, so there’s no need to upload it twice.
Here’s how to add and tidy your files:
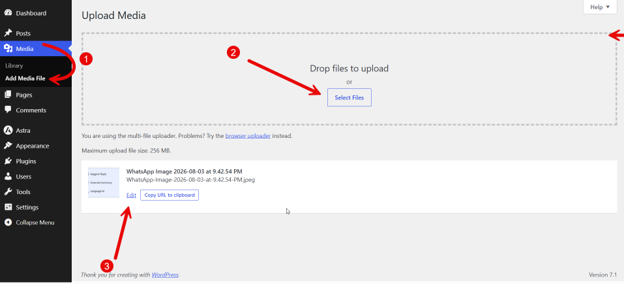
- Go to Media → Add Media File.
- Click Select Files to upload from your computer. You can also drag and drop a file here.
- Click Edit to open file details.
- Add a title, a caption, a description, and alt text.
- Use the Edit Image option to crop or rotate an image if required.
- Once done, click Update to save changes.
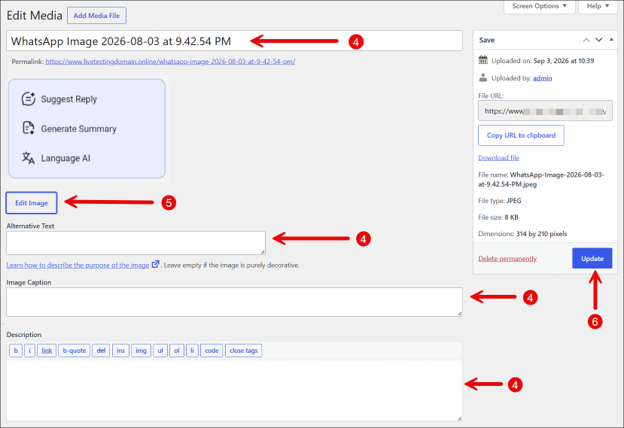
Alt text is worth consideration. It describes the image for people using screen readers, and it shows if an image fails to load. It can offer search engines a little context, too, but keep it honest and natural rather than keyword stuffing.
NOTE:
Clear out files you no longer use. A tidy library is easier to search, and it keeps your storage under control as your site grows.
Customising Your Website’s Appearance
WordPress allows you to shape how your site looks without touching code. What you can change, and where you find those controls, depends heavily on your theme. So, before we go further, it helps to know that themes work in two different ways (we’ll cover this in a subsequent section), and your options follow from that.
Themes
Your theme sets the overall look of your site, including its layout, colours, and fonts. Switching theme changes that entire look at once.
Here’s how to add one:
- Navigate to Appearance → Themes → Add Theme.
- Search the free directory or upload a theme file you’ve bought.
- Click Install, then Activate to switch to it.

Remember, when you activate a new theme, it can move your layout around and shift where content sits, so preview it first, or test it on a staging copy if your host offers one. For a full explanation, see our guide on how to install a WordPress theme.
Customiser vs Site Editor
Here’s the part that trips people up: not every theme is edited in the same place. There are two systems and knowing which one you have can save you a lot of confusion.
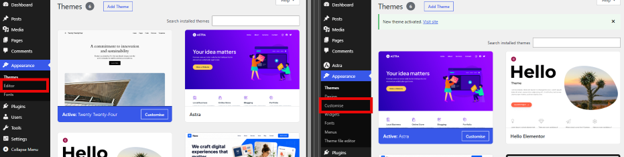
Classic themes like Astra use the Customiser. You’ll find it under Appearance, then Customise, with a live preview on one side and settings on the other.
- Block themes use the Site Editor instead. To access it, navigate to Appearance → Editor. These themes contain built-in WordPress blocks, so you edit your header, footer, and templates in the same visual way you build a page.
- Unsure which you’ve got? Open Appearance. If you see Customise, your theme is classic. If you see Editor, it’s a block theme. The controls and wording differ between the two, so follow the path that matches what’s on your screen.
Menus
Menus are how visitors move around your site. Setting one up is straightforward:
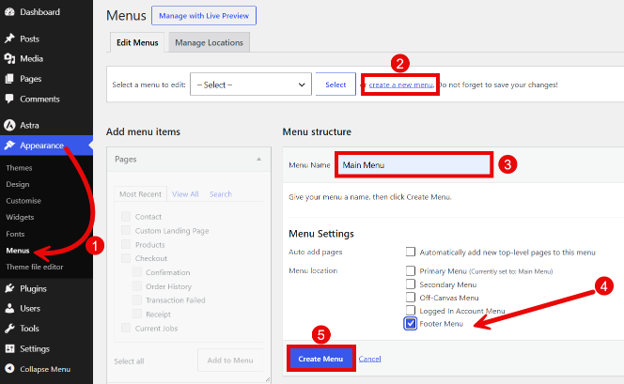
- Go to Appearance → Menus.
- Click Create a new menu link.
- Give your new menu a name.
- Choose a location, for example your main navigation or footer.
- Then, click Create Menu.
- Tick the pages or posts you want, or add a custom link, a category, or a tag.
- Click Add to Menu. You can also drag the items to reorder them.
- Once done, click Save Menu.

Block themes may handle navigation inside the Site Editor instead, using a navigation block, so the steps can look a little different there.
Widgets
Widgets are small content blocks you drop into set areas of your site, usually the sidebar or footer. They’re handy for a search box, recent posts, social links, or a clear call to action that guides people to contact you.
You’ll usually manage these under Appearance → Widgets. Block themes work differently: they add these elements directly into templates through the Site Editor. To get more from them, read our guide on WordPress widgets.
Header, Logo, Background, & Colours
Your header, logo, background, and colour choices carry your brand, so they are worth getting right. The settings appear in different places depending on your theme, but the idea is the same:
Open the Customiser on a classic theme, or the Site Editor on a block theme. Look for the identity, header, or colour options. Aim for clarity over decoration. A readable logo, enough contrast between text and background, and a tidy header help visitors far more than busy styling. For step-by-step assistance, see our guide on how to edit the header in WordPress.
Extend Your Site with Plugins
Plugins are add-ons that provide your site with new features without any coding. Need a contact form, an online shop, or better security? There’s a plugin for it. Here’s how to install them, manage them, and choose them wisely.
Installing Plugins
Adding a plugin from the official directory takes just a few clicks:
- Go to Plugins → Add Plugin.
- Use the search box to find the plugin you want.
- Click Install Now on your chosen plugin.
- Once it installs, click Activate to switch it on.
- Open its settings to set it up the way you need.

New plugins often add their own menu item to the sidebar or a section under Settings, so that’s where you will usually find their options. If you have purchased a third-party plugin and want to install it, see our guide on how to install WordPress plugins manually.
Manage Installed Plugins
You can see everything you’ve added by navigating to Plugins → Installed Plugins. From this list, you can update a plugin when a new version is ready, deactivate one you’re not using, or delete it completely to keep things tidy. You may also enable/disable auto-updates. However, ensure you enable auto-updates for trusted plugins only.

IMPORTANT:
Updates are essential because they often fix security holes and bugs. After any update, take a moment to check the plugin’s settings and give the affected part of your site a quick look, since updates can occasionally change how something behaves.
Choose Plugins Carefully
Not every plugin is worth installing, and a poor one can slow your site down or open it to risk. So do a quick check before you add anything.
On the plugin’s page, look for:
- A recent update date, which shows it’s still maintained.
- A high number of active installs, a sign others trust it.
- Solid reviews and ratings from real users.
- Confirmation it’s compatible with your WordPress version.
- Signs the developer answers support questions.
Also weigh the performance cost, as every active plugin adds a little load. The safest habit is a lean setup: fewer, well-chosen plugins from trusted sources, and none left installed that you don’t use.
Manage Users & Permissions
If other people help run your site, give each one their own account rather than sharing a single login.
Here’s how to add a new user via the WordPress admin dashboard:
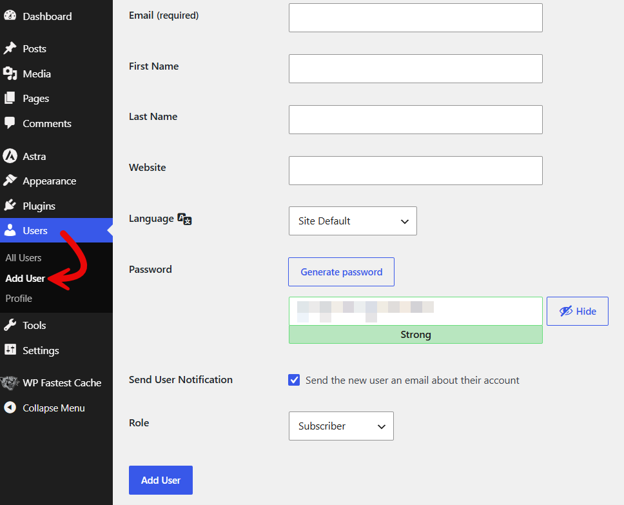
- Go to Users → Add User.
- Fill in their username, email, and password.
- Choose a role, then click Add User.
Choose a role wisely because user permissions depend on the role you select.
The role decides what someone can and cannot do, so choose carefully. The safest approach is least privilege: give each person the lowest role that still allows them to do their job. A writer who only adds blog posts doesn’t need Administrator access and handing this out to everyone is one of the easiest ways to put your site at risk.
Here’s how the roles compare:
| Role | What They Can Do | Best Suited For |
| Administrator | Full control over the whole site | The owner or a trusted manager |
| Editor | Manage and publish everyone’s content | A content lead or editor |
| Author | Write and publish their own posts | Regular in-house writers |
| Contributor | Write posts, but do not publish them | Guest or new writers |
| Subscriber | Manage their own profile only | Members or newsletter sign-ups |
| Super Admin | Manage a network of sites | Multisite network owners |
Configuring Core WordPress Settings
The WordPress admin dashboard’s Settings menu controls how your site behaves behind the scenes. You set most of these once when you start, then rarely change them.
Here’s what each screen does:
General
Here, you set your site’s identity. This is where you enter your site title and tagline, check your site and WordPress addresses, and confirm the admin email that receives important notices.
Set your time zone, then choose the date and time formats you prefer.

Writing
This sets the defaults for new posts. You can choose the category a post falls into if you don’t select one yourself, along with the default post format. It’s a small screen, but tidy defaults save you a step each time you publish.

Reading
This menu helps you decide what people see first. You can show your latest posts on the homepage, or set a static page instead, which most businesses prefer. You can also set how many posts appear on blog pages.
WARNING:
This screen holds a box called Discourage search engines from indexing this site. Leave it ticked, and Google won’t index your site, so ensure it is unticked once you are live.

Discussion
This menu controls comments. You can decide whether comments are permitted, hold them for approval before they appear, get notified of new ones, and filter out spam.
Here, sensible moderation keeps the conversation useful and your site clean. If comments aren’t right for your business at all, our guide on how to disable comments in WordPress shows you how to switch them off.
Media
This allows you to set the default sizes WordPress creates for your images, covering thumbnail, medium, and large. Sticking to consistent sizes keeps your Media Library tidy and your pages loading predictably as you add more files.

Permalinks
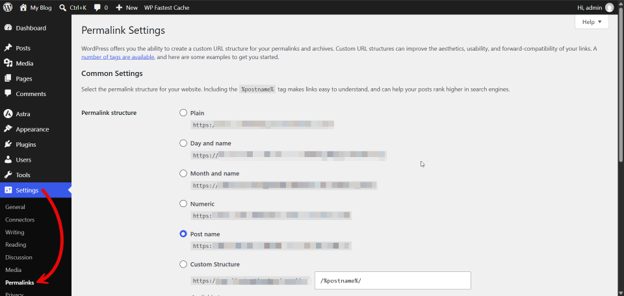
The Settings → Permalinks menu sets how your web addresses are built. Post name is the usual choice, giving clean, readable links that people and search engines follow easily.
However, don’t overstate this: neat URLs help, but they won’t rank a site on their own. And if you change this on an established site, set up redirects first, or your existing links will break.
Using WordPress Tools
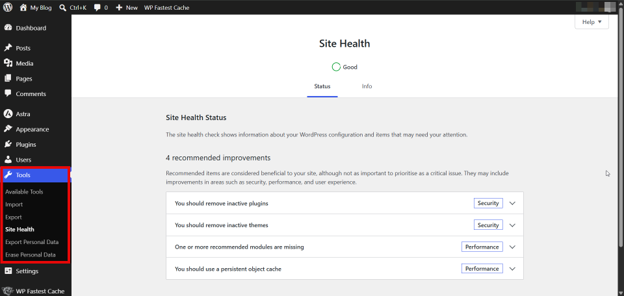
The Tools menu holds a few handy utilities that are easy to miss. The main two are Import and Export.
- Import pulls content in from another platform, which is useful when you’re moving to WordPress.
- Export saves your posts, pages, and other content to a file you can keep or load elsewhere.
There’s also Site Health, which runs performance and security checks and suggests fixes worth your attention. Some plugins also add their own items to this menu, so don’t be surprised to find extras there.
IMPORTANT:
Exporting your website isn’t a full backup. It saves your content, but not your themes, plugins, settings, or database. For proper protection, follow our guide on how to back up your WordPress site and keep complete, regular backups.
The WordPress Toolbar (Admin Bar)
The toolbar is the thin bar that sits across the top of your WordPress admin dashboard whenever you’re logged in. It’s built for speed, providing shortcuts to the jobs you reach for most, from anywhere on your site.
A few things you will use often:
- Visit Site flips you to the live front end.
- The comments icon jumps straight to pending comments.
- +New lets you start a fresh post, page, media upload, or user in one click.
- Plugins can add their own shortcuts here as well, so the bar grows to match the tools you install.

How to Hide the Toolbar on the Front End
Sometimes you want to view your site exactly as visitors do, without the bar in the way. You can switch it off for the front end in a few clicks:
- Go to Users → Profile.
- Untick Show Toolbar when viewing site.
- Scroll down and click Update Profile.
This only affects the front end, providing a clean preview of your live pages. The toolbar still appears inside the admin panel, so you lose nothing while you’re working.

Handy WP Admin Productivity Tips
A few small habits make WordPress admin dashboard faster to work in every day. These are the ones worth picking up early:
- Save ideas the moment they land with Quick Draft, so nothing slips through between sessions.
- Speed up comment moderation with keyboard shortcuts, using j and k to move through comments and a to approve.
- Declutter any screen through Screen Options, showing only the fields and columns you use.
- Open the Help tab in the top corner of each screen for quick tips on whatever you’re doing.
- Set one regular slot for updates, so your core software, themes, and plugins stay current without you having to think about it.
- Glance at Site Health now and then, and act on anything it marks as critical.
- Keep your plugin list short, clearing out anything you’ve stopped using.
- Write down important changes somewhere your team can see, so the next person knows what was done and why.
WordPress Admin Dashboard Security Best Practices
This is the section to go through carefully. Solid security in wp admin comes from a handful of steady habits, not one big fix.
Start with access. Give every account a strong, unique password, and switch on WordPress two-factor authentication, so a stolen password alone won’t allow anyone in.
Keep Administrator access to the few people who truly need it, give each person their own login so activity traces back to one user, and remove accounts for anyone who’s left. Review who holds which role every so often, since access tends to creep upward over time.
Then protect the site itself. Regularly update WordPress, your theme, and your plugins, because those updates close known security gaps. Only install themes and plugins from trusted sources and keep complete backups so you can recover quickly if something breaks.
You can also harden the login with a security plugin, but treat that as one layer among several, not the entire job. We will look at the flip side of these habits shortly, in our guide on common mistakes to avoid (add a link to ‘Common WordPress Admin Dashboard Mistakes to Avoid’).
Common WP Admin Access Problems (& How to Fix Them)
Locked out, or seeing an error where your dashboard should be? Most access problems have known causes. First, try two safe moves:
- Clear your browser cache.
- Open the login page in a private or incognito window to rule out old, cached data.
If the trouble remains, here’s what’s usually behind it:
- Forgotten Password: Use the Lost your password? link, as covered earlier.
- Wrong Login URL: The default /wp-admin may have been changed.
- 403 Forbidden: Usually a file-permission or security-rule block.
- 404 Not Found: The login page cannot be located, often after a URL change.
- Too Many Failed Attempts: A lockout plugin has paused your access, so wait or ask an admin.
- Plugin Conflict: A plugin misbehaving after an update or install.
- Theme Conflict: A theme clashing with your current setup.
- Caching issues: Old cached files showing a broken or outdated screen.
- .htaccess Problems: A damaged file affecting how your site loads.
- File-permission Errors: Incorrect permissions blocking normal access.
- White Screen or Critical Error: Usually a plugin or theme fault.
If you’re fully locked out and a plugin looks likely, one advanced fix is to connect over FTP and rename your plugins folder. That switches every plugin off at once and often restores access. It’s a technical step, so if you’re unsure, contact Domains.co.za support rather than risk making things worse.
How to Fix a Slow WordPress Admin Dashboard
A sluggish dashboard is usually a sign of an issue within your site, not just hosting.
Several things can slow wp admin down:
- Too many active plugins, or a few heavy ones.
- Admin scripts running in the background.
- Outdated WordPress, themes, or plugins.
- A theme and a plugin clashing.
- Bloated database full of old data.
- External services your site keeps calling out to.
- Large WooCommerce store with kits if orders.
- Thin hosting resources for what you’re running.
Work through the simple fixes first. Remove plugins you don’t use, update the rest carefully, and clear your caches. Check Site Health for pointers and tidy your database if it’s gone bigger. If the dashboard is still slow after that, contact your host to review your resources. Just don’t assume hosting is the cause by default, since the culprit often sits within the site itself.
WP Admin for South African Businesses
For South African businesses, the dashboard isn’t only admin; it’s how you keep your website earning its keep. Most small and medium businesses need to make their own changes, and WP Admin lets them do exactly that:
- Refresh a service page.
- Launch a promotion.
- Update contact details or trading hours.
- Keep the blog ticking over without waiting on anyone.
Agencies benefit in a slightly different way. By giving clients and contributors safe, limited roles, they allow people to update content without handing over the keys to the entire site.
It matters because a lot rides on these sites. They drive quote requests, WhatsApp enquiries, online bookings, phone calls, and ecommerce sales.
When you can manage the dashboard confidently, there’s no delay the moment something needs changing, whether it’s a price, a stock line, or a public holiday notice. Reliable WordPress hosting in South Africa keeps that day-to-day work smooth.
Load-Shedding & Admin Access Planning
Load-shedding is a fact of business life here, and it can strike just when you need to update your site. If the one person who knows the dashboard is offline or without power, an urgent change can stall. A little planning prevents this.
Set up more than one trusted administrator, so nothing relies on a single person being reachable. Use role-based access to distribute work safely, allowing the correct people to make the right changes. And write down your key processes, from logging in to publishing, so anyone can step in when necessary.
However, ensure you share clear procedures (not passwords). Give each person their own account rather than a shared login, so access stays secure even when your schedule doesn’t.
POPIA & WP Admin Access
This is practical guidance for running your site, not legal advice. If you need a formal view on compliance, speak to a professional.
Your dashboard often holds more personal information than you would expect. It can collect names, email addresses, and other details from contact forms, comments, user accounts, and enquiries. If you sell online, it also stores customer orders, and some plugins keep their own records and activity logs on top of that.
POPIA expects that kind of information to be handled with care, and good dashboard habits go a long way. Limit access to people who genuinely need it and give each one a role that fits their job rather than full control. Review those roles now, remove accounts no longer in use, and keep only the personal data you need.
Common WordPress Admin Dashboard Mistakes to Avoid
Most WordPress admin dashboard trouble comes from a few avoidable habits. Here’s what to watch for, and why each one bites:
- Too Many Administrators: Every extra one is another account that can be misused or compromised.
- Shared Logins: When something changes, you can’t tell who did it.
- Ignoring Updates: Known security holes stay open longer than they should.
- Plugin Overload: More plugins mean a slower site and a wider door for problems.
- Editing Live Pages without Previewing: Your visitors see the errors before you do.
- Changing Permalinks without Redirects: Your existing links break, and traffic hits dead ends.
- Publishing Before Checking Mobile View: Most visitors are on phones, and a broken layout costs you.
- Ignoring Site Health Warnings: Small issues quietly grow into bigger ones.
- Skipping a Backup Before Big Changes: If it breaks, you’ve no clean way back.
- Leaving Old Users Active: Unused accounts are an easy target that no one’s watching.
Your Beginner WP Admin Checklist
Before you say your setup’s done, run through this quick list and tick each one off:
- Login tested and working.
- Password-reset email arrives correctly.
- Site title and time zone set.
- Homepage display confirmed.
- Permalinks reviewed.
- Users and roles checked.
- Plugins updated, unused ones removed.
- Theme confirmed and active.
- Menu checked and links working.
- Contact and enquiry forms tested.
- Backups confirmed and running.
- Two-factor authentication enabled where possible.
- Site Health reviewed.
Keep this handy and go through it now and then to save time and money later.
When to Call a Developer or Domains.co.za Support
Knowing when to get help is a skill itself, and asking isn’t a failure. Some jobs are quicker, safer, and cheaper in expert hands. Reach out to a developer or Domains.co.za support when you hit the following:
- An admin lockout you can’t clear.
- 403 or 404 errors on your login page.
- .htaccess or file-permission issues.
- Plugin conflicts you can’t pin down.
- A white screen or critical error.
- Dashboard that stays slow after the usual fixes.
- Updates that fail or won’t complete.
- Any security concern, from a suspected hack to strange activity.
- Database-level password resets.
- WooCommerce or membership problems inside the admin.
There’s no prize for struggling alone. Getting the correct assistance early often prevents a small issue from becoming downtime or data loss. For hands-on assistance, Domains.co.za experts are there when you need it.
Final Thoughts: WP Admin Is Powerful When It’s Managed Carefully
The WordPress Admin Dashboard hands you real control over your website. As you’ve seen, it’s where your content, design, users, settings, and security all come together in a single place. That power works best when it’s managed with care: secure access, sensible settings, regular maintenance, and roles that match what each person does.
If you’re just starting out, don’t feel you should master everything today. Learn the areas you use most, return to this guide when you need it, and your confidence will build with every visit.
WordPress website management becomes easier with reliable WordPress Hosting from Domains.co.za, backed by secure infrastructure, practical local support, and hosting options built for growing South African websites.
![Strip Banner Text - Manage every post, page, & plugin with ease. WordPress Hosting made for South African sites. [Learn More]](/articles/wp-content/uploads/2026/10/wordpress-admin-dashboard-02.webp "Manage every post, page, & plugin with ease. WordPress Hosting made for South African sites. [Learn More]")
Power Up Your Site: How to Install a WordPress Plugin
VIDEO: Power Up Your Site: How to Install a WordPress Plugin
FAQS
Is the WordPress admin dashboard free to use?
Yes. The WordPress software and its dashboard are free and open source, so wp admin comes built in. What you pay for is your hosting and domain name, plus any premium themes or plugins you choose to add.
Can I manage my WordPress site from my phone?
You can. Just open your mobile browser and login at your usual /wp-admin address. There’s also an official WordPress app for Android and iOS that handles everyday jobs, though the full dashboard is easier to use on a laptop or desktop.
What’s the difference between the wordpress.com and wordpress.org dashboards?
WordPress.org is the self-hosted version you run on your own hosting, and it provides the full dashboard with no limits on themes or plugins. WordPress.com is a hosted service with plan-based restrictions, so its dashboard can look different and offer fewer options on lower tiers. If you’re hosted by a provider, you will be using the self-hosted version.
If I delete a post or page by mistake, can I get it back?
Usually, yes. Deleted posts and pages go to the Bin first, where they remain for about 30 days before WordPress permanently removes them. Open Posts or Pages, click Bin, then Restore to return an item before that window closes.
How often should I login to maintain my WordPress site?
There’s no fixed rule, but a light weekly check works well for most sites: run any updates, respond to comments, and confirm your backups are running. Once a month, take a closer look at Site Health, review your users and roles, and remove plugins you no longer use.
Other Blogs of Interest
- The wp_get_attachment_image Function Makes WordPress Image Output Cleaner & More Reliable
- WordPress Stuck In Maintenance Mode? Here’s What It Means & How To Prevent It
- WordPress Blocks Make Website Customisation Easier Without Being Into A Developer
- WordPress Widgets Help You Add Useful Features Without Rebuilding Your Website
- The WordPress get_post_meta Function Helps You Turn Custom Fields Into Dynamic Content

Rhett isn’t just a writer at Domains.co.za – he’s our resident WordPress content guru. With over 8 years of experience as a content writer, with a background in copywriting, journalism, research, and SEO, and a passion for websites.
Rhett authors informative blogs and articles that simplify the complexities of WordPress, website builders, domains, and cPanel hosting. Rhett’s clear explanations and practical tips provide valuable resources for anyone wanting to own and build a website. Just don’t ask him about coding before he’s had coffee.