


This guide shows you how to restore website with JerBackup. Regular backups are an important part of website management because they provide a recovery option when files are accidentally deleted, a website is corrupted or an unwanted change needs to be reversed.
JetBackup is a backup and restoration system commonly integrated into cPanel environments. Depending on the hosting configuration, it can provide access to available website backups and allow authorised users to restore selected account data.
Restoring a backup should be performed carefully, because restoring an older version can replace newer files, databases or other account data. JetBackup documentation specifically warns that a full account restoration can replace the existing account and permanently remove data created after the selected backup point.
The exact JetBackup options available can vary depending on the version installed and the configuration of your Managed cPanel Hosting environment.
Before restoring a website, identify the backup date you require and consider whether you need to restore the entire account or only specific components. Where possible, make a current backup or otherwise preserve important recent data before performing a restoration.
IMPORTANT:
If you are restoring a WooCommerce website or another ecommerce website, remember that order information may be stored in the website’s database. Restoring an older database backup may overwrite orders received after the selected backup was created. Before restoring the database, export or otherwise preserve any recent order data that you need to retain.
TABLE OF CONTENTS
How To Restore Website With JetBackup
1. Login to the Domains.co.za Customer Portal.
2. Open the Manage Services dropdown menu.
3. Choose Managed cPanel Hosting from the available options.
4. Click Manage next to the domain associated with your Managed cPanel Hosting package.
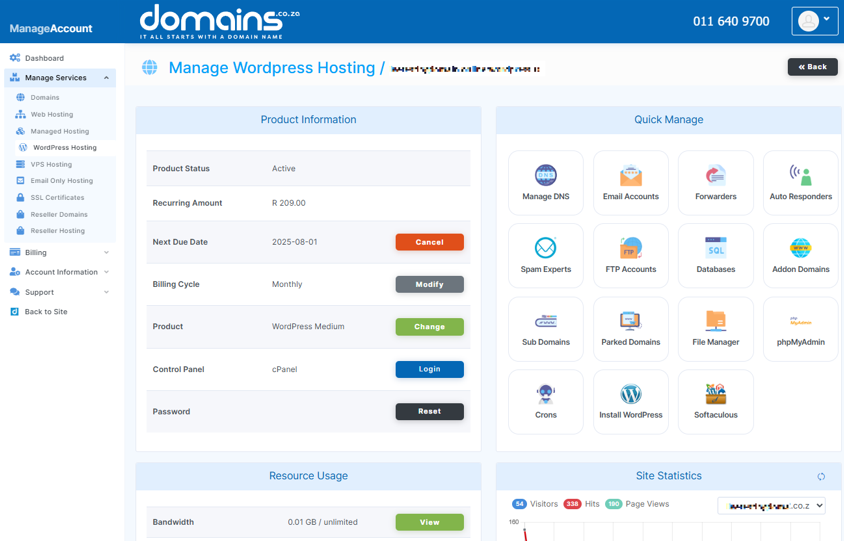
5. Click Login next to Control Panel to access cPanel.

6. Locate JetBackup within the cPanel interface.
7. Open the appropriate JetBackup backup or restoration section.
8. Select the type of backup you wish to restore.
9. Review the available backup dates and select the backup containing the website version you require.
10. Review the restoration options carefully before continuing.
11. Select the restore option for the required backup.
12. Review any warning explaining which existing data will be replaced.
13. Confirm that you understand the effects of the restoration.
14. Confirm the restoration to add it to the JetBackup restore queue.
15. Allow JetBackup to complete the restoration process.
16. Check the website after the restoration has completed.
17. Test the website, database-driven functionality, forms and other important features.
Important Warning About Full Account Restores
A full account restoration can have significant consequences. JetBackup’s documentation states that a full account restoration can terminate the selected existing account, recreate it from the backup and permanently remove data created after the selected restore point.
For this reason, do not select a full account restoration simply because a single website file or database table needs to be recovered.
Additional Information
- Always identify the correct backup date before beginning a restoration.
- A full account restoration can replace newer data with information from the selected backup.
- Data created after the selected restore point may be permanently lost during a full account restoration.
- You should consider preserving important recent data before restoring an older backup.
- Test the website thoroughly after completing a restoration.
- Check both the website files and database-driven functionality after restoring a WordPress website.
- A restoration may affect email, databases, website files and other account data depending on the restoration type selected.
- The JetBackup interface and available options may differ depending on the version and hosting configuration.
- Do not restore an older backup unless you are confident that it contains the version of the website you require.
- If you are unsure which backup to restore, contact Domains.co.za Support before proceeding.
Login to Domains.co.za Account
1. Go to the Domains.co.za website Account Login page.

2. Enter your Email and Password and click the Sign In button.
3. You will see the Domains.co.za Dashboard, displaying the Manage Account menu on the left and your Account Information, Account Overview and Open Support Tickets on the right.


