


This guide explains how to install a WordPress theme using three methods, how to customise themes after installation, and ways to troubleshoot common issues that can occur during the process.
A WordPress theme determines how your website looks and feels. It controls the design, layout, typography, colours, navigation menus, headers, footers, and many other visual elements that visitors see when they browse your website.
Installing the correct theme is an important step in creating a professional website. WordPress offers thousands of free themes through the WordPress Theme Directory, while premium and custom themes are available from reputable developers and marketplaces.
Installing a theme is usually simple, but changing your website’s design can affect menus, widgets, layouts, and theme-specific settings. For this reason, it is always recommended to back up your WordPress website before making major changes.
TABLE OF CONTENTS
What Is a WordPress Theme?
A WordPress theme is a collection of files that controls the appearance and presentation of a WordPress website.
Themes determine:
- Website layout.
- Typography and fonts.
- Colour schemes.
- Headers and footers.
- Navigation menus.
- Widget areas.
- Overall visual style.
While themes control how content is displayed, your pages, posts, images, and other content remain stored separately in the WordPress database.
Theme vs Template: What’s the Difference?
Although the terms are sometimes confused, themes and templates serve different purposes.
- A theme controls the overall design and appearance of your entire website.
- A template controls the layout of a specific page, post, archive, or content type within that theme.
For example, your website may use a single theme, but have different templates for blog posts, landing pages, and contact pages.
Before You Install a WordPress Theme
Before changing your website’s design, take a few minutes to prepare properly.
- Back Up Your Website First: Installing or changing a theme can affect layouts, menus, widgets, and custom styling. Creating a complete WordPress website backup ensures you can restore your website if something goes wrong.
- Consider Using a Staging Site: If your website is already live, perhaps first test the new theme on a staging website. This allows you to identify issues without affecting visitors.
- Check That the Theme Is Responsive: A responsive theme automatically adapts to different screen sizes, including smartphones, tablets, laptops, and desktop computers.
- Check Speed & Performance: Some themes include many built-in features that can slow a website down. Lightweight themes generally offer a better loading speed and user experience.
- Review Customisation Options: Before installing a theme, check whether it allows easy customisation of:
- Fonts.
- Colours.
- Layouts.
- Headers.
- Footers.
- Menus.
- Widget areas.
- Check Support & Update History: Themes that receive regular updates are generally more secure and compatible with the latest versions of WordPress and PHP.
Method 1: Install a Theme from the WordPress Theme Directory
This is the easiest method for beginners; it uses free themes available directly within WordPress.
Step 1: Login to Your WordPress Dashboard
1. Login to the Domains.co.za Customer Portal using your account credentials.
2. Navigate to Manage Services from the dropdown menu.
3. Select your WordPress Hosting package and click Manage.
4. Click Login to cPanel to access your hosting control panel.
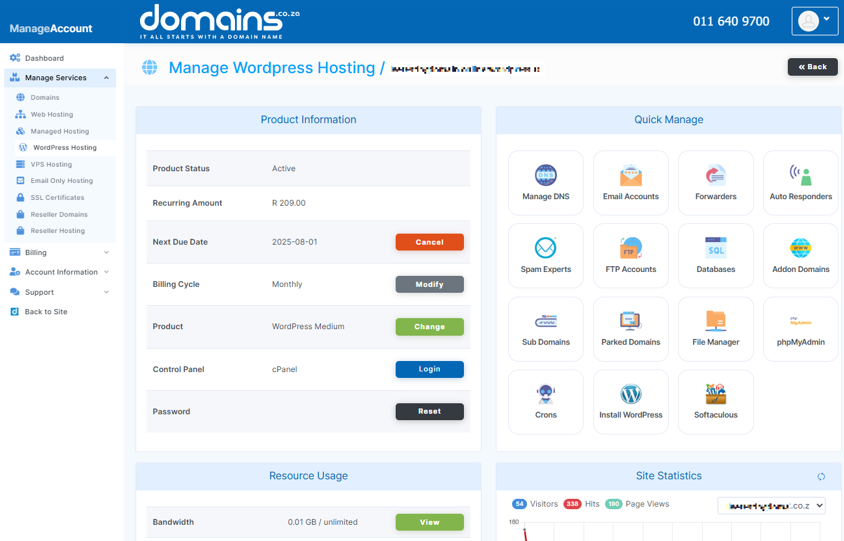
5. Open WordPress Manager by Softaculous.
6. Click Login next to your WordPress installation to access the WordPress Dashboard.
Step 2: Go to Appearance > Themes
7. Select Appearance from the left-hand menu.
8. Click Themes to open the theme management area.
Step 3: Click Add New Theme
9. Click Add New Theme at the top of the page.
10. This opens the WordPress Theme Directory within your dashboard.
Step 4: Search or Filter Themes
11. Use the search box to find themes by keyword or name.
12. Browse featured, popular, latest, or block themes.
13. Apply filters to narrow your search based on layout and functionality.
Step 5: Preview the Theme
14. Hover over the theme you wish to install.
15. Click Preview to see how it will appear on your website.
16. Review the design carefully before activation.
Step 6: Install & Activate the Theme
17. Click Install.
18. Wait for WordPress to complete the installation.
19. Click Activate to make the theme live on your website.
Method 2: Manually Upload a WordPress Theme
This manual method is commonly used for premium themes, custom themes, or themes downloaded from trusted third-party developers.
Step 1: Download the Theme ZIP File
1. Download the theme package from the developer.
2. Keep the theme file in its original .zip format.
Step 2: Go to Appearance > Themes > Add New Theme
3. Login to your WordPress Dashboard.
4. Navigate to Appearance > Themes.
5. Click Add New Theme.
Step 3: Click Upload Theme
6. Click Upload Theme.
7. Select the theme .zip file from your computer.
8. Click Install Now.
Step 4: Install & Activate the Theme
9. Wait for the installation to finish.
10. Click Activate to apply the theme to your website.
Step 5: Check the Website After Activation
After activating the theme, review:
- Homepage layouts.
- Navigation menus.
- Contact forms.
- Footer sections.
- Blog posts.
- Product or service pages.
- Mobile display.
- Page speed.
Method 3: Install a WordPress Theme Using FTP or SFTP
This is an advanced installation method intended for users who need direct file access or cannot upload themes through the WordPress Dashboard.
IMPORTANT:
FTP and SFTP require hosting credentials and familiarity with website file management.
Step 1: Download & Unzip the Theme Folder
1. Download the theme package.
2. Extract the .zip file on your computer.
3. Locate the theme folder that contains the theme files.
Step 2: Connect to Your Website with an FTP/SFTP Client
4. Open your preferred FTP or SFTP application.
5. Enter your hosting credentials.
6. Connect to your hosting account.
Step 3: Upload the Theme Folder to wp-content/themes
7. Browse to your WordPress installation directory.
8. Open the wp-content folder.
9. Open the themes folder.
10. Upload the extracted theme folder to:
wp-content/themes
11. Wait for the upload process to complete.
Step 4: Activate the Theme in WordPress
12. Login to your WordPress Dashboard.
13. Navigate to Appearance > Themes.
14. Locate the newly uploaded theme.
15. Click Activate.
How to Customise Your WordPress Theme
Use the WordPress Customiser or Site Editor
Classic themes generally use Appearance > Customise, while block themes often use Appearance > Editor.
Update Colours, Fonts, & Layouts
Most modern themes allow you to adjust:
- Colours.
- Fonts.
- Layouts.
- Header styles.
- Footer designs.
This helps align your website with your brand identity.
After changing themes, you may need to reassign:
- Navigation menus.
- Footer menus.
- Sidebar widgets.
- Footer widgets.
Preview Changes Before Publishing
Always preview customisations before publishing them to ensure they display correctly across your website.
Troubleshooting WordPress Theme Installation Issues
- “The Theme Is Missing the style.css Stylesheet”: This error often occurs when the wrong file has been uploaded. Ensure you upload the actual installable theme .zip file instead of the complete developer package.
- Broken or Incomplete Theme Upload: If the upload fails or files are missing, delete the theme and upload it again.
- Theme Incompatibility with WordPress: Older themes may not support the latest version of WordPress or PHP. Check the developer’s compatibility information before installation.
- Plugin Conflicts After Theme Activation: If your website experiences issues after activation, temporarily deactivate plugins and reactivate them individually to identify potential conflicts.
Best Practices After Installing a Theme
- Delete Unused Themes: Unused themes can increase maintenance and security risks. Remove themes you no longer require, but keep one default WordPress theme installed as a fallback.
- Enable Theme Updates Where Appropriate: Theme updates often contain important security patches, bug fixes, and compatibility improvements. For business-critical websites, test updates carefully before applying them to a live environment.
- Test the Website on Mobile: A significant percentage of South African website visitors browse using mobile devices. Ensure your website functions correctly across different screen sizes.
You’re All Set
Your WordPress theme is now installed and ready to use.
Take time to test your website thoroughly after activation. Check your homepage, navigation, forms, layouts, mobile responsiveness, and loading speed to ensure everything functions correctly.
If you encounter issues that you cannot resolve, contact Domains.co.za Support or consult a qualified WordPress developer for assistance.
Additional Information
- A WordPress theme controls the appearance of your website, while your content remains stored separately in the WordPress database.
- Free themes are available directly from the WordPress Theme Directory and can be installed from within the WordPress Dashboard.
- Premium and custom themes often require manual uploads using a .zip file provided by the developer.
- Theme changes can affect menus, widgets, layouts, and theme-specific settings, even when your content remains unchanged.
- Responsive themes help ensure your website displays correctly on mobile phones, tablets, and desktop computers.
- Heavy themes with excessive features may negatively affect website speed and overall performance.
- FTP and SFTP installations require access to your hosting credentials and are generally recommended for advanced users.
- Only download themes from trusted developers and reputable marketplaces to reduce security risks.
- Keeping your theme regularly updated helps maintain compatibility with WordPress core updates and plugins.
- Regular website backups provide an important safety net before making significant design changes.
Login to Domains.co.za Account
1. Go to the Domains.co.za website Account Login page.

2. Enter your Email and Password and click the Sign In button.
3. You will see the Domains.co.za Dashboard, displaying the Manage Account menu on the left and your Account Information, Account Overview and Open Support Tickets on the right.


