





This guide explains how to safely enable WordPress error logs, where to find them, how to read them, and when to disable debugging after troubleshooting is complete.
When a WordPress website encounters problems, the symptoms are often easy to spot. Pages may stop loading correctly, plugins may stop working, forms may fail to submit, or visitors may encounter errors such as the White Screen of Death or a 500 Internal Server Error. However, identifying the exact cause of these issues can be far more challenging.
This is where WordPress error logs become useful. Error logs record technical information about what is happening behind the scenes on your website, helping website owners, developers, and support teams identify problems more accurately. Instead of guessing whether an issue is caused by a plugin, theme, PHP setting, or server configuration, error logs provide clues that can help pinpoint the source of the problem.
WordPress includes built-in debugging tools that can generate error logs when enabled correctly. Whether you are troubleshooting a plugin conflict, investigating a theme issue, diagnosing a PHP error, or trying to resolve a server problem, understanding how to configure and review WordPress error logs can save valuable time.
TABLE OF CONTENTS
What Are WordPress Error Logs?
WordPress error logs are files that record warnings, errors, notices, and technical issues that occur while your website is running.
These logs are designed to help identify problems that may not be visible to website visitors.
Depending on the issue, error logs can record:
- Plugin errors.
- Theme conflicts.
- PHP errors.
- Database issues.
- Memory limit problems.
- Missing files.
- Server-related errors.
- WordPress warnings and notices.
Error logs provide valuable troubleshooting information that can help narrow down the source of a problem.
Why WordPress Error Logs Matter
WordPress error logs can help users, developers, and hosting providers identify issues more efficiently.
They are particularly useful for diagnosing:
- Plugins conflicts.
- Theme issues.
- PHP errors.
- Database errors.
- Memory exhaustion problems.
- 500 Internal Server Errors.
- White Screen of Death errors.
- Missing file or file path issues.
Without logs, troubleshooting often becomes a process of trial and error.
Before You Begin
Before enabling WordPress error logs, ensure you have:
- Access to your WordPress Dashboard if you plan to use a plugin.
- Access to your Domains.co.za hosting account.
- Access to cPanel.
- Access to File Manager or FTP/SFTP.
- A recent website backup.
- A basic understanding of any recent website changes.
- A text editor for reviewing log files.
Creating a backup before editing WordPress files is strongly recommended.
Important Safety Note About Debug Mode
WordPress error logs rely on a feature called Debug Mode.
Debug Mode is useful during troubleshooting because it records technical information about website problems.
However, Debug Mode should not remain enabled permanently on a live website because it may:
- Expose sensitive technical information.
- Affect website performance.
- Create unnecessarily large log files.
- Display technical errors to visitors if incorrectly configured.
For this reason, Debug Mode should only be enabled when actively investigating a problem.
Method 1: Enable WordPress Error Logs Using wp-config.php
This method is recommended for users who are comfortable editing WordPress configuration files.
Step 1: Open Your Website Files
1. Login to the Domains.co.za Customer Portal using your account credentials.
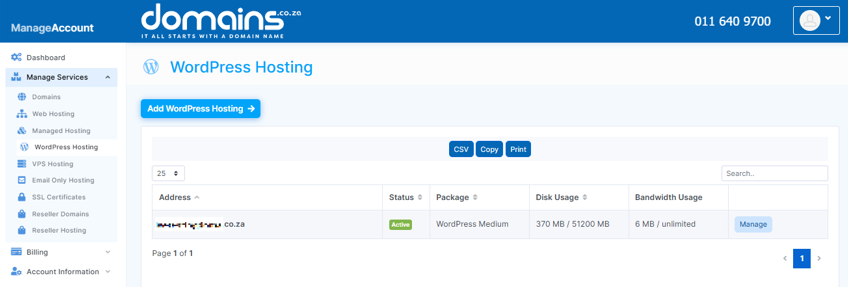
2. Navigate to Manage Services from the dropdown menu.
3. Select your WordPress Hosting package and click Manage.
4. Click Login to cPanel to access your hosting control panel.
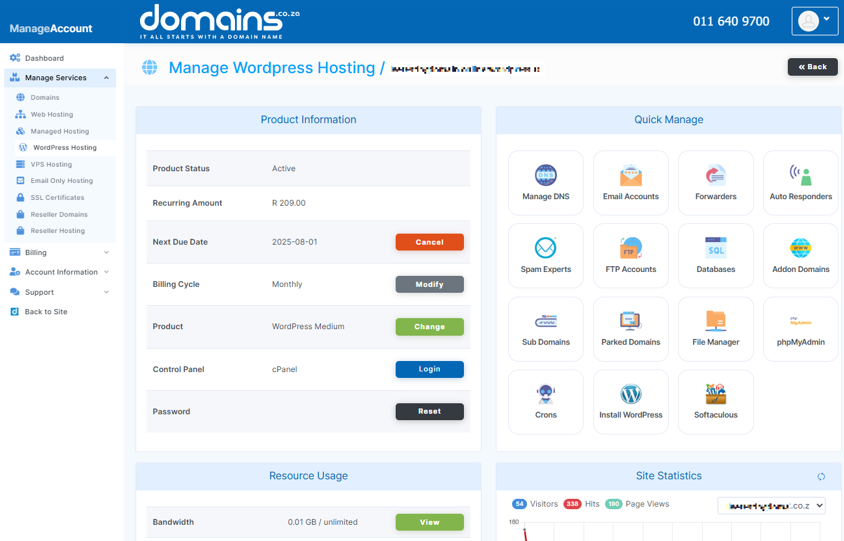
5. Open File Manager and navigate to your website files.
6. Alternatively, you may connect using an FTP or SFTP client.
Step 2: Find the wp-config.php File
7. Locate the wp-config.php file in the root directory of your WordPress installation.
8. For many websites, this is located in the public_html directory.
Step 3: Back Up wp-config.php Before Editing
9. Download a copy of the file or create a backup within File Manager before making any changes.
10. This allows you to restore the original file if required.
Step 4: Enable WordPress Debug Mode
11. Open the wp-config.php file using the built-in editor or your preferred text editor.
12. Locate the existing WP_DEBUG setting.
13. If it exists, change it from false to true.
14. If it does not exist, add the setting before the line that says:
/* That's all, stop editing! Happy publishing. */Step 5: Enable Debug Logging
15. Add or update the WordPress debug logging setting so that errors are written to a log file.
16. This allows you to review errors without relying on messages displayed on the website.
Step 6: Hide Errors from Website Visitors
17. Configure WordPress to save errors to the log file while preventing visitors from seeing technical error messages.
18. This is particularly important on live websites.
Recommended Debug Settings for a Live Site
The following settings are commonly recommended when troubleshooting a live website:
- define( ‘WP_DEBUG’, true );
- define( ‘WP_DEBUG_LOG’, true );
- define( ‘WP_DEBUG_DISPLAY’, false );
These settings perform the following functions:
- WP_DEBUG enables WordPress debugging mode.
- WP_DEBUG_LOG saves errors and warnings to a debug log file.
- WP_DEBUG_DISPLAY prevents technical error messages from being displayed to website visitors.
This approach helps protect the visitor experience while still collecting useful troubleshooting information.
Method 2: Enable WordPress Error Logs with a Debugging Plugin
This method is often easier for users who prefer not to manually edit configuration files.
Step 1: Install a Reputable Debugging Plugin
1. Login to your WordPress Dashboard.
2. Navigate to Plugins > Add New Plugin.
3. Search for a reputable debugging plugin such as WP Debugging.
4. Before installing any plugin, review:
- Plugin ratings.
- Update history.
- Compatibility information.
- User reviews.
Step 2: Activate the Plugin
1. Install and activate the plugin.
2. Many debugging plugins automatically configure the necessary WordPress debugging settings.
Step 3: Review the Plugin Settings
3. Review the plugin configuration and determine which debugging tools have been enabled.
4. Some plugins may also provide access to additional troubleshooting tools such as Query Monitor or Debug Bar.
How to Access Your WordPress Error Log File
After logging has been enabled, WordPress typically creates a debug log file.
Step 1: Open File Manager or FTP/SFTP
1. Login to the Domains.co.za Customer Portal.
2. Open the Manage Services dropdown menu.
3. Select Web Hosting.
4. Click Manage next to your hosting package.
5. Click Login next to Control Panel to access cPanel.
6. Open File Manager.
Step 2: Go to the wp-content Folder
7. Navigate to the following directory:
/wp-content/Step 3: Open or Download debug.log
8. Locate the file named:
debug.log9. The full path is commonly:
/wp-content/debug.log10. You can view the file directly or download it for review using a text editor.
How to Read WordPress Error Logs
Error logs may appear intimidating at first, but understanding a few key elements can make them easier to interpret.
- Each log entry usually includes a timestamp.
- Keep in mind that timestamps may use UTC rather than South African local time.
- This can affect how events align with the time you experienced the issue.
Look for Fatal Errors, Warnings, & Notices
- Common log entries include:
- Fatal Errors: Serious issues that can stop functionality or prevent pages from loading.
- Warnings: Potential problems that may not immediately break the website.
- Notices: Lower-priority development messages that may not affect functionality.
Identify the Plugin, Theme, or File Path Mentioned
- Many log entries include file paths.
- These paths often identify the plugin, theme, or file involved in the problem.
- This information can help narrow down where to start troubleshooting.
How to Fix Issues Found in WordPress Error Logs
If a plugin appears in the log:
- Update the plugin.
- Deactivate the plugin temporarily.
- Replace it with an alternative.
- Contact the plugin developer if necessary.
If a theme is generating errors:
- Update the theme.
- Temporarily switch to a default WordPress theme.
- Contact the theme developer.
If you see memory exhaustion or timeout messages:
- Review PHP memory settings.
- Check resource usage.
- Contact Domains.co.za Support if additional resources may be required.
- Database connection or query errors should be investigated carefully.
- If you are unsure how to proceed, contact Domains.co.za Support or your developer for assistance.
How to Disable WordPress Debug Mode
After troubleshooting is complete, Debug Mode should be disabled.
Disable Debug Mode in wp-config.php
Edit the wp-config.php file and change the settings to:
- define( ‘WP_DEBUG’, false );
- define( ‘WP_DEBUG_LOG’, false );
- define( ‘WP_DEBUG_DISPLAY’, false );
Save the file and test the website.
If you enabled debugging using a plugin, deactivate the plugin once troubleshooting is complete.
When to Contact Support
Contact Domains.co.za Support or a qualified developer if:
- Errors continue after troubleshooting.
- Fatal errors persist.
- Database errors repeatedly appear.
- Server-related issues are suspected.
- Error logs are difficult to interpret.
- The website is inaccessible.
- You are unsure which corrective action to take.
Providing copies of relevant log entries can help support teams diagnose issues faster.
Additional Information
- WordPress error logs are one of the most effective troubleshooting tools available to website owners and developers.
- Error logs often provide clues rather than complete solutions and may require interpretation.
- Debug Mode should only remain enabled for as long as necessary to investigate an issue.
- The debug.log file can grow significantly in size if debugging remains enabled for extended periods.
- Plugin and theme file paths often provide valuable information about the source of an error.
- Memory-related errors may indicate that the website requires additional resources or optimisation.
- Timestamps in log files may use UTC rather than South African local time.
- It is strongly recommended to create a backup before editing wp-config.php.
- Sharing relevant log entries with support teams can speed up troubleshooting and resolution.
You’re All Set
WordPress error logs can make troubleshooting far more manageable by providing valuable insight into what is happening behind the scenes on your website. Whether you choose to enable logging through wp-config.php or a debugging plugin, error logs can help identify plugin conflicts, theme issues, PHP errors, database problems, and server-related concerns.
Once troubleshooting is complete, remember to disable Debug Mode, keep regular backups, and continue monitoring your website to help maintain stability and performance.
Login to Domains.co.za Account
1. Go to the Domains.co.za website Account Login page.

2. Enter your Email and Password and click the Sign In button.
3. You will see the Domains.co.za Dashboard, displaying the Manage Account menu on the left and your Account Information, Account Overview and Open Support Tickets on the right.


