


TL;DR
You can add Google Analytics 4 (GA4) to WordPress using Site Kit by Google, the Google tag or Google Tag Manager. Site Kit is usually the simplest option for most WordPress users, while Google Tag Manager provides more control for advanced tracking. After installation, use the GA4 Realtime report to confirm that data is being collected.
Overview
With WordPress Hosting, you can connect your WordPress website to Google Analytics 4 (GA4) to measure how visitors find and interact with your site.
There are three main ways to add Google Analytics to WordPress: Site Kit by Google, the Google tag or Google Tag Manager (GTM). The method you choose will depend on your technical experience and tracking requirements.
Whichever method you use, always verify the installation after setup rather than assuming that Analytics is collecting data correctly.
TABLE OF CONTENTS
What Do You Need Before Adding Google Analytics to WordPress?
Before adding Google Analytics to WordPress, you need a Google account, access to Google Analytics, a GA4 property with a Web Data Stream and WordPress Administrator access.
You may also need:
- A recent website backup if you plan to make code changes.
- Permission to configure tracking and privacy settings.
- Access to your website’s cookie or consent configuration where applicable.
- The GA4 Measurement ID associated with your website.
What Is a GA4 Web Data Stream?
A Web Data Stream represents the website from which Google Analytics collects data. It contains your website’s GA4 Measurement ID, which normally begins with G-.
You can access your Web Data Stream in Google Analytics by going to:
Admin → Data Streams → Web
Select your website’s stream to view its Measurement ID and Google tag information.
How to Create a Google Analytics 4 Property
If you don’t already have a GA4 property for your WordPress website:
1. Sign in to Google Analytics.
2. Open Admin.
3. Create a new Analytics account or select an existing account.
4. Create a new Property for your website.
5. Set the appropriate reporting time zone and currency.
6. Follow the prompts until you are asked to select a platform.
7. Select Web.
8. Enter your WordPress website URL.
9. Enter a recognisable name for the Web Data Stream.
10. Create the Web Data Stream.
11. Copy or record the Measurement ID for later use.
Keep the Analytics account, property and Measurement ID details available while completing the WordPress setup.
Which Method Should You Use to Add Google Analytics to WordPress?
The best installation method depends on how you manage your website and whether you need advanced tracking:
| Method | Best For | Code Required? | Complexity |
| Site Kit by Google | Most WordPress users | No | Low |
| Google tag | Users wanting a direct implementation | Some | Medium |
| Google Tag Manager | Marketing teams, multiple tags and advanced event tracking | Initial setup | Medium to High |
For most Domains.co.za WordPress customers, Site Kit by Google is the simplest starting point because it can connect WordPress to GA4 without requiring you to manually edit theme files.
Method 1 – How to Add Google Analytics with Site Kit by Google
Site Kit by Google provides a straightforward way to connect WordPress to Google Analytics and can automatically place the required Analytics code on your website.
Step 1: Install Site Kit by Google
1. Login to your WordPress Dashboard.
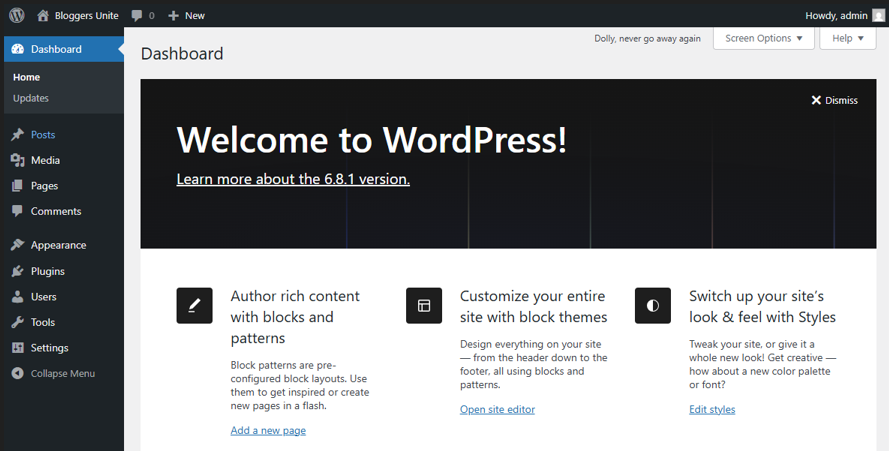
2. Select Plugins.
3. Click Add New Plugin.
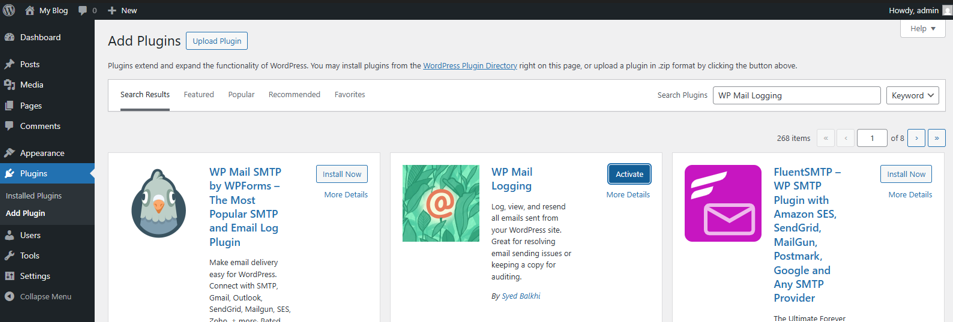
4. Search for Site Kit by Google.
5. Click Install Now.
6. Click Activate when the installation has completed.
Step 2: Start the Site Kit Setup
1. Open Site Kit from the WordPress Dashboard.
2. Start the setup process.
3. Select the option to connect Google Analytics.
4. Click Sign in with Google.
Step 3: Authorise Your Google Account
Sign in using the Google account associated with your website and Analytics property.
Review the permissions requested by Google and follow the current Site Kit setup process to authorise the connection.
Step 4: Connect the Correct GA4 Property
Select the appropriate:
- Analytics account.
- GA4 property.
- Web Data Stream.
If you haven’t created the required Analytics property or Web Data Stream yet, Site Kit may provide options to create them during setup.
Complete the Analytics configuration when prompted.
Step 5: Confirm Site Kit Has Added the Google Tag
Once setup is complete, Site Kit should confirm that Google Analytics is connected.
Site Kit normally places the required Analytics code automatically, so you don’t need to manually add the same GA4 tag to your website.
IMPORTANT:
Don’t install another copy of the same GA4 tag using a different plugin, manual code or Google Tag Manager, unless your tracking configuration has specifically been designed that way.
Method 2 – How to Add the Google Tag to WordPress
You can install the Google tag directly if you prefer not to use Site Kit. Because this method involves adding code to the website, create a recent backup before making changes.
Step 1: Copy Your Google Tag
In Google Analytics:
1. Open Admin.
2. Select Data Streams.
3. Select your website’s Web Data Stream.
4. Open the Google tag settings.
5. Select View tag instructions.
6. Select Install manually.
7. Copy the Google tag provided.
The tag needs to load in the <head> section of your website.
Step 2: Add the Tag Using a Safe Code-Insertion Method
Instead of directly editing your active Parent Theme files, use an update-safe implementation such as:
- A reputable header/footer code-insertion plugin.
- A code-injection feature officially supported by your WordPress theme.
- A Child Theme or custom implementation configured by a developer.
Directly editing a Parent Theme’s header.php file is not recommended, as the default method because a future theme update may overwrite your changes. Incorrect PHP or template changes can also cause website errors, and Block Themes may use a different template structure.
If you need to make file-level changes, consider this an advanced implementation and create a backup first.
Step 3: Avoid Installing the Same GA4 Tag Twice
IMPORTANT:
If Site Kit, another Analytics plugin or Google Tag Manager is already loading the same GA4 tag, don’t add another copy unless the tracking setup has intentionally been configured to do so.
Duplicate Analytics implementations can affect the accuracy of the data being collected.
Method 3 – How to Add GA4 with Google Tag Manager
Google Tag Manager (GTM) is useful when you need centralised control over multiple tracking technologies, such as GA4, Google Ads, event tracking and conversion tracking.
Step 1: Create a Google Tag Manager Account and Container
1. Sign in to Google Tag Manager.
2. Create an account.
3. Enter an appropriate account name.
4. Create a container for your website.
5. Select Web as the target platform.
6. Complete the container setup.
Step 2: Install the GTM Container on WordPress
Google Tag Manager provides installation snippets that need to be added to the prescribed locations on your website.
Install these using a compatible tag-management or code-insertion plugin, or have a developer implement them correctly.
Step 3: Add the Google Tag in GTM
1. Open your GTM container.
2. Select Tags.
3. Create a new tag.
4. Select the appropriate Google tag configuration.
5. Enter your website’s GA4 Measurement ID.
6. Give the tag a recognisable name.
Step 4: Trigger the Google Tag on All Pages
Configure the tag to trigger on All Pages if you want GA4 tracking to load throughout the website.
Save the configuration.
Step 5: Preview the Container
Before publishing your changes, use GTM Preview / Tag Assistant to test the container.
Visit your website and confirm that the intended Google tag is firing correctly.
Step 6: Submit & Publish
Once you have confirmed that the tag works correctly:
1. Return to Google Tag Manager.
2. Click Submit.
3. Add the relevant version information if required.
4. Click Publish.
How Do You Verify Google Analytics Is Working?
The simplest way to verify your installation is to open the GA4 Realtime report, visit your website and confirm that your activity appears.
1. Sign in to Google Analytics.
2. Select the correct GA4 property.
3. Go to Reports → Realtime.
4. Open your WordPress website in another browser tab or window.
5. Navigate to several pages.
6. Return to the Realtime report.
7. Check whether your activity appears.
Initial data collection may take some time after a new installation, while information displayed within Site Kit and other Analytics reports may take longer to populate.
Why Is Google Analytics Not Tracking My WordPress Site?
If GA4 doesn’t appear to be collecting data, check the installation before replacing or reinstalling your tracking configuration.
Is the Measurement ID Correct?
Confirm that the G- Measurement ID used on the website matches the Web Data Stream for the correct GA4 property.
Is Google Analytics Installed More Than Once?
Check whether Site Kit, another Analytics plugin, Google Tag Manager or manually inserted code is loading the same GA4 configuration more than once.
Did You Publish the GTM Container?
Changes made in Google Tag Manager don’t become part of the live container until they have been submitted and published.
Use GTM Preview to test the configuration and confirm that the correct version has been published.
Is a Cookie Consent Tool Blocking Analytics?
Your website’s privacy or consent configuration may intentionally prevent Analytics from loading until the visitor has made a consent choice.
Review the consent configuration if Analytics works in some circumstances but not others.
Is Caching Delaying the Change?
If you’ve recently changed your Analytics implementation, clear relevant:
- WordPress caching.
- Server caching.
- Browser caching.
- CDN caching where applicable.
Then test the website again.
Are You Looking at the Correct GA4 Property?
If your Google account manages multiple websites, confirm that you are viewing the correct Analytics account, GA4 property and Web Data Stream.
Do You Need Cookie Consent for Google Analytics?
Google Analytics can use cookies and other technologies to measure how visitors interact with a website. The consent requirements that apply to your website depend on factors including your jurisdiction, Analytics configuration and how visitor data is being used.
South African businesses should ensure their Analytics implementation complies with applicable privacy and data-protection requirements, including POPIA where relevant. Requirements may differ for websites serving visitors in other jurisdictions.
Google Consent Mode doesn’t provide a cookie banner itself. Instead, it allows Google tags to respond to consent choices captured through the website’s consent-management mechanism.
Review your website’s privacy and consent requirements before enabling Analytics publicly. This information is provided for general guidance and is not legal advice.
Additional Information
- Use one intentional GA4 implementation method unless your tracking configuration has specifically been designed to use multiple methods.
- Keep a record of your Analytics account, GA4 property, Web Data Stream and Measurement ID for future website management.
- Test Analytics again after website migrations, major theme changes or significant plugin changes.
- Configure meaningful events and key events once basic GA4 tracking is working correctly.
- Don’t intentionally send personally identifiable information to GA4 unless the implementation is explicitly supported and complies with Google’s policies and applicable privacy requirements.
- Review your cookie and consent configuration before making Analytics publicly active.
- Use GTM Preview / Tag Assistant before publishing Google Tag Manager changes.
- Keep Site Kit and other Analytics-related WordPress plugins updated.
- Give access to Google Analytics only to authorised users.
- Periodically review your GA4 data-retention settings, linked Google products and advertising-related settings.
Login to Domains.co.za Account
1. Go to the Domains.co.za website Account Login page.

2. Enter your Email and Password and click the Sign In button.
3. You will see the Domains.co.za Dashboard, displaying the Manage Account menu on the left and your Account Information, Account Overview and Open Support Tickets on the right.

FAQS
Is Google Analytics Free?
Yes. Standard Google Analytics 4 is available without a subscription fee, although other Google products and services may have separate costs.
What Is the Difference Between GA4 and Google Tag Manager?
GA4 is an analytics platform that collects, processes and reports website and application data. Google Tag Manager is a tag-management system that can be used to deploy GA4 and other measurement or marketing tags.
Do I Need Google Tag Manager to Use GA4?
No. You can install GA4 using Site Kit by Google, another suitable implementation method or the Google tag without using Google Tag Manager.
Do I Need to Add the Google Tag to Every WordPress Page Manually?
No. When the Google tag is correctly implemented site-wide, it loads across the relevant WordPress pages automatically.
Can I Use Site Kit and Google Tag Manager Together?
Yes, but you need to avoid accidentally deploying the same GA4 configuration twice. Decide which implementation is responsible for loading the Analytics tag and check for duplicate tracking.
How Long Does Google Analytics Take to Show Data?
Realtime activity may begin appearing shortly after GA4 has been correctly installed, although initial data collection can take some time. Standard Analytics reports and Site Kit dashboard information may take longer to populate.


