


This guide explains how to how to disable xmlrpc.php, and how to check whether it is enabled, how to disable it safely using a plugin or .htaccess, and what to test afterwards to ensure your website continues functioning correctly.
WordPress includes a file called xmlrpc.php that allows external applications and services to communicate with your website remotely. Historically, XML-RPC was an important feature because it enabled remote publishing, mobile app access, offline blogging tools, pingbacks, trackbacks, and various third-party integrations.
Today, many WordPress websites rely on newer technologies such as the WordPress REST API, reducing the need for XML-RPC in many situations. However, some plugins, services, and integrations still depend on it, meaning it should not be disabled without first understanding how it is being used.
While xmlrpc.php is a legitimate WordPress feature and is not malware, attackers sometimes target it for brute force login attempts, pingback abuse, and other malicious activity. For websites that do not require XML-RPC, disabling it can help reduce unnecessary security risks.
TABLE OF CONTENTS
What Is xmlrpc.php in WordPress?
The xmlrpc.php file is a built-in WordPress component that allows external applications and services to communicate with WordPress remotely.
It acts as a communication endpoint between WordPress and authorised third-party tools.
XML-RPC can be used to:
- Publish content remotely.
- Manage websites using mobile applications.
- Connect older blogging tools.
- Support pingbacks and trackbacks.
- Enable certain Legacy integrations.
What Was XML-RPC Originally Used For?
XML-RPC was introduced before modern web APIs became widely available.
Its original purpose was to allow users to manage their WordPress websites without logging in through a web browser.
Common uses included:
- Remote publishing tools.
- Offline blogging software.
- WordPress mobile applications.
- Pingbacks and trackbacks.
- Third-party publishing integrations.
Although many websites now use newer alternatives, some services still rely on XML-RPC functionality.
Do You Still Need XML-RPC Today?
Many modern WordPress websites no longer require XML-RPC.
However, you may still need it if you use:
- The WordPress mobile app.
- Certain Jetpack features.
- Legacy publishing software.
- Older third-party integrations.
- Remote content management tools.
Before disabling XML-RPC, verify whether any of your website services depend on it.
Why Disable xmlrpc.php?
If XML-RPC is not actively being used, disabling it can help reduce security risks.
- Brute Force Login Attempts: Attackers sometimes abuse XML-RPC to submit multiple login attempts more efficiently than through the standard WordPress login page. This can increase the likelihood of password guessing attacks against poorly secured accounts.
- DDoS & Pingback Abuse: XML-RPC includes pingback functionality that can be misused as part of distributed denial-of-service (DDoS) attacks. Attackers may use compromised websites to generate large volumes of requests against other targets.
- Unnecessary Attack Surface: Every enabled feature presents a potential point of attack. If XML-RPC is not required, disabling it reduces the number of publicly accessible components on your website.
Before You Disable XML-RPC
Before making any changes, confirm whether you:
- Use the WordPress mobile application.
- Use Jetpack or related services.
- Publish content remotely.
- Have any integrations that depend on XML-RPC.
- Had a recent website backup.
- Have access to File Manager or FTP/SFTP.
- Have a hosting environment that uses Apache and .htaccess.
- Whether you can test website functionality afterwards.
Step 1: Check Whether XML-RPC Is Enabled
Before disabling XML-RPC, verify its status.
Check XML-RPC in Your Browser
Visit:
- If XML-RPC is enabled, you will often see a message like:
- XML-RPC server accepts POST requests only.
- This indicates that the endpoint is available.
What You May See If XML-RPC Is Disabled
If XML-RPC has already been blocked, you may see:
- 403 Forbidden.
- 404 Not Found.
- A security plugin warning page.
- A firewall block message.
- Any of these may indicate that access has already been restricted.
Check XML-RPC with an Online Testing Tool
Some online XML-RPC testing tools can verify whether the endpoint is reachable.
Only use reputable tools and never enter sensitive usernames or passwords into unknown websites.
Method 1: Disable XML-RPC with a Plugin
This is generally the easiest method for most website owners.
Step 1: Access Your Hosting Account
1. Login to the Domains.co.za Customer Portal using your account credentials.
2. Navigate to Manage Services from the dropdown menu.
3. Select your WordPress Hosting package and click Manage.
4. Click Login to cPanel to access your hosting control panel.
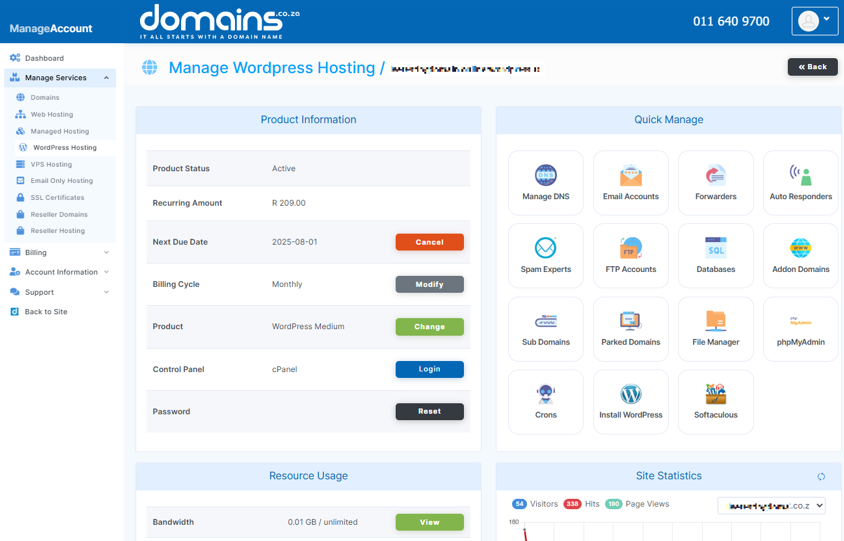
Step 2: Open the WordPress Dashboard
1. In cPanel, open your WordPress Admin Dashboard.
2. Navigate to Plugins.
Step 3: Choose a Reputable XML-RPC Plugin
1. Search for a plugin designed to disable or restrict XML-RPC.
2. Review maintenance status, compatibility, user reviews, and support availability.
3. Verify that the plugin is actively maintained before installation.
Step 4: Install & Activate the Plugin
1. Click Install Now.
2. Wait for the installation to complete.
3. Click Activate.
Step 5: Review Plugin Settings
1. Open the plugin settings if applicable.
2. Configure any XML-RPC protection options.
3. Save the settings if required.
Some plugins work automatically, while others require manual configuration.
Step 6: Re-Test xmlrpc.php
Confirm that access is blocked or restricted according to the plugin configuration.
Method 2: Disable XML-RPC Manually Using .htaccess
This method is suitable for users comfortable editing website files.
Important Warning: Incorrect changes to .htaccess can cause website errors.
Always create a backup before making modifications.
Step 1: Access Your Hosting Account
1. Login to the Domains.co.za Customer Portal using your account credentials.
2. Navigate to Manage Services from the dropdown menu.
3. Select your WordPress Hosting package and click Manage.
4. Click Login to cPanel to access your hosting control panel.
5. Click Login next to Control Panel to access cPanel.
Step 2: Back Up Your .htaccess File
1. Open File Manager.
2. Locate the existing .htaccess file.
3. Download a copy or create a duplicate before editing.
Step 3: Locate the WordPress Root Directory
1. Navigate to your WordPress installation directory.
2. Locate the .htaccess file.
The file is often found inside:
public_htmlHowever, the root directory may vary depending on your hosting configuration.
Step 4: Add XML-RPC Blocking Rules
Add the following code to your .htaccess file:
# Block WordPress XML-RPC requests
    Order Deny,Allow
    Deny from all
This rule blocks public access to xmlrpc.php.
Step 5: Allow a Trusted IP Only If Required
If you have a specific requirement for XML-RPC access, you may restrict access to authorised IP addresses only.
Be aware that dynamic IP addresses may change, making this approach unreliable for some users.
Step 6: Save & Test the Website
1. Save the updated file.
2. Visit your homepage.
3. Test the WordPress Dashboard.
4. Test website forms.
5. Visit the xmlrpc.php URL.
6. Verify that XML-RPC access is blocked.
Important Note for Nginx or Non-Apache Servers
The .htaccess method applies to Apache-based hosting environments.
If your website uses:
Different server-level rules may be required. Contact Domains.co.za Support if you are unsure which server software your hosting environment uses.
What Could Break If You Disable XML-RPC?
Disabling XML-RPC may affect:
The WordPress mobile application.
- Certain Jetpack features.
- Remote publishing tools.
- Pingbacks and trackbacks.
- Legacy integrations.
Always test any services that may depend on XML-RPC after making changes.
Safer Alternatives If You Cannot Fully Disable XML-RPC
- If XML-RPC is required, consider alternative security measures.
- Restrict XML-RPC to Specific IP Addresses: Limit access to trusted locations where practical.
- Use a Security Plugin or Web Application Firewall: Security plugins and firewalls can monitor and restrict XML-RPC abuse.
- Disable Only Pingbacks: Some security plugins allow pingbacks to be disabled while leaving other XML-RPC functionality available.
- Strengthen Login Security: Implement:
- Strong passwords.
- Login rate limiting.
- Monitor Access Logs: Review website logs regularly to identify suspicious XML-RPC activity.
How to Re-Enable XML-RPC
If you need XML-RPC again:
Plugin Method
1. Deactivate or remove the XML-RPC blocking plugin.
2. Retest the xmlrpc.php endpoint.
.htaccess Method
1. Rmove the XML-RPC blocking rules.
2. Save the file.
3. Test the endpoint again.
What to Check After Disabling XML-RPC
After making changes, verify that:
- The website loads correctly.
- The WordPress Dashboard functions normally.
- Contact forms continue working.
- The WordPress mobile application works if used.
- Jetpack features continue functioning.
- Important integrations remain operational.
- Security logs show reduced XML-RPC activity.
- Website caches have been cleared.
Troubleshooting Common XML-RPC Issues
- XML-RPC Still Appears Enabled: Clear website caches and verify that the plugin or .htaccess rule was applied correctly.
- .htaccess Changes Cause a 500 Error: Restore the backup copy immediately and review the file for syntax errors.
- The .htaccess File Is Missing: Enable hidden files within File Manager settings or connect using FTP/SFTP.
- Jetpack Stops Working: XML-RPC may be required by certain Jetpack features. Review Jetpack documentation before permanently disabling XML-RPC.
- WordPress Mobile App Cannot Connect: The mobile application may require XML-RPC functionality depending on your setup.
- Online Test Results Differ from Browser Results: Caching, firewalls, and security services may affect test outcomes.
- Changes Do Not Appear Immediately: Clear browser, website, CDN, and server caches before retesting.
Additional Information
- XML-RPC is a legitimate WordPress feature and should not be confused with malware.
- Many modern WordPress websites rely on the REST API instead of XML-RPC for certain functionality.
- Some plugins and third-party services may still require XML-RPC to operate correctly.
- Disabling XML-RPC should always be tested carefully before being implemented permanently.
- Website backups should be created before editing .htaccess or installing new security plugins.
- Apache-compatible .htaccess rules may not work on every hosting environment.
- Dynamic IP addresses can make IP-based XML-RPC restrictions difficult to maintain.
- Two-factor authentication provides additional protection against brute force attacks.
- Security plugins can often block XML-RPC abuse without completely disabling the feature.
- If you are unsure whether XML-RPC is required for your website, contact Domains.co.za Support or consult a qualified WordPress developer before making changes.
Login to Domains.co.za Account
1. Go to the Domains.co.za website Account Login page.

2. Enter your Email and Password and click the Sign In button.
3. You will see the Domains.co.za Dashboard, displaying the Manage Account menu on the left and your Account Information, Account Overview and Open Support Tickets on the right.


