


This guide explains several ways to disable comments in WordPress, including built-in WordPress settings, bulk editing options, plugins, and advanced customisation methods.
Comments can be a valuable way to engage with visitors, encourage discussions, and gather feedback on your WordPress website. However, not every website needs a comment section. Business websites, portfolio sites, landing pages, online stores, and company websites often have little need for public discussions, and managing comments can sometimes create additional work.
Many WordPress website owners choose to disable comments to reduce spam, prevent off-topic discussions, simplify website management, or improve content moderation. Depending on your requirements, you may wish to disable comments on future posts, existing content, selected pages, or on your entire website.
Before making any changes, it is important to understand the difference between disabling new comments, hiding existing comments, deleting comments, and disabling pingbacks or trackbacks. These actions affect your website differently and may have long-term implications.
TABLE OF CONTENTS
Before You Begin
Before disabling comments, consider the following:
- Decide whether comments should be disabled across the entire website or only on specific content.
- Determine whether existing comments should remain visible.
- Decide whether comments should be hidden, closed, moderated, or permanently deleted.
- Check whether custom post types, media attachments, or WooCommerce content are affected.
- Create a backup of your WordPress website before installing plugins or making advanced customisations.
- Consider whether moderation may be more suitable than completely disabling comments.
Understanding Comment Settings
Before proceeding, it helps to understand what each action does:
- Disabling New Comments: This prevents visitors from submitting new comments on selected content.
- Hiding Existing Comments: Existing comments remain in the database but are no longer displayed publicly.
- Deleting Existing Comments: Comments are permanently removed from the website. Before deletion, it’s recommended you make a full backup.
- Removing Comment Support: This removes comment functionality from specific post types.
- Disabling Pingbacks and Trackbacks: This prevents notifications from other websites linking to your content.
- Moderating Comments: Comments are reviewed and approved before becoming visible to visitors.
Method 1: Disable Comments on Future WordPress Posts
This method prevents comments on newly published posts but does not affect existing content.
1. Login to the Domains.co.za Customer Portal using your account credentials.
2. Navigate to Manage Services from the dropdown menu.
3. Select your WordPress Hosting package and click Manage.
4. Click Login to cPanel to access your hosting control panel.
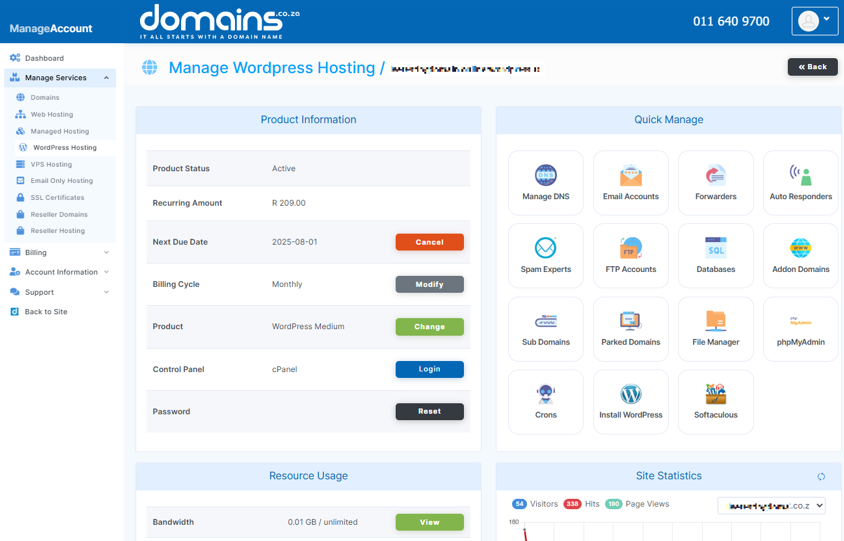
5. Open the WordPress Admin Dashboard.
6. Click Settings in the WordPress dashboard.
7. Select Discussion from the menu.
8. Locate Allow people to submit comments on new posts.
9. Untick the checkbox.
10. Review any related discussion settings.
11. Scroll to the bottom of the page.
12. Click Save Changes.
Future posts will no longer accept comments, although previously published content may still allow them.
Method 2: Disable Comments on a Single Post or Page
This method is useful when only specific content requires comments to be disabled.
1. Open the WordPress Admin Dashboard.
2. Select Posts > All Posts or Pages > All Pages.
3. Locate the content you wish to modify.
4. Hover over the post or page title.
5. Click Quick Edit.
6. Untick Allow Comments.
7. Click Update to save the change.
Method 3: Disable Comments on Multiple Posts or Pages
Bulk editing is useful when many items need updating.
1. Open the WordPress Admin Dashboard.
2. Open Posts > All Posts or Pages > All Pages.
3. Tick the items you wish to update.
4. Select Edit from Bulk Actions.
5. Click Apply.
6. Locate Comments.
7. Select Do Not Allow.
8. Click Update.
The selected content will no longer accept new comments.
Method 4: Disable Comments Across the Entire Website Using a Plugin
A plugin can simplify comment management across large websites.
1. Open the WordPress Admin Dashboard.
2. Navigate to Plugins > Add New Plugin.
3. Search for a dedicated comment management plugin such as Disable Comments.
4. Review compatibility, update history, ratings, and support information before installation.
5. Click Install Now.
6. Once installation is complete, click Activate.
7. Open the plugin settings page.
8. Choose whether comments should be disabled on posts, pages, media attachments, custom post types, or the entire website.
9. Save the configuration.
Existing comments can usually remain visible, be hidden, or be removed.
Always create a backup before permanently deleting comments.
Method 5: Disable Comments with Custom Code
This method is recommended for experienced users or developers.
Use a Child Theme or Site-Specific Plugin
Custom code should never be added directly to a parent theme, because updates can overwrite modifications.
Custom code can:
- Disable comments and trackbacks.
- Remove comment support from post types.
- Hide comment forms.
- Remove comment-related menu items.
- Redirect users away from comment management screens.
Always test custom code on a staging website and create a full backup before making changes to production websites.
How to Disable Pingbacks & Trackbacks
Pingbacks and trackbacks are separate from standard visitor comments.
Disable Them for Future Content
- Open Settings > Discussion.
- Locate the pingback and trackback options.
- Disable the relevant settings.
- Save your changes.
Older posts may require individual editing or bulk editing to remove existing pingback permissions.
Alternative Ways to Manage Comments
If you still want audience engagement, consider these alternatives:
- Require Manual Approval: Comments will only appear after administrator review.
- Hold Comments with Links for Review: This can help reduce spam submissions.
- Require User Login: Requiring visitors to login may reduce automated spam.
- Automatically Close Older Comments: WordPress can automatically close comments after a specified number of days.
- Use an Anti-Spam Solution: Tools such as Akismet or Antispam Bee can help reduce spam while allowing legitimate discussions.
Always verify your WordPress plugin compatibility and maintenance status before installation.
How to Check That Comments Are Fully Disabled
After making changes, verify the following:
- New posts no longer accept comments.
- Existing posts behave as expected.
- Pages display correctly.
- Media attachment pages have been checked.
- Custom post types have been reviewed.
- Mobile devices display correctly.
- Logged-in and logged-out users see the correct behaviour.
- Comment forms no longer appear where comments are disabled.
- Pingbacks and trackbacks are no longer active, where required.
Troubleshooting Comments That Still Appear
If comments continue to appear:
- Existing posts may still have comments enabled individually.
- Your theme might display an outdated comment template.
- Cached pages may still show older content.
- Plugin settings may only apply to selected content types.
- A page builder may include its own discussion element.
- Custom code might have been added to the wrong theme.
- WordPress Multisite networks may have separate settings for individual sites.
Additional Information
- Disabling comments on future posts does not automatically disable comments on existing content.
- Existing comments remain visible unless they are specifically hidden or deleted.
- Permanently deleting comments cannot always be reversed without a backup.
- Disabling comments does not prevent all forms of spam, as contact forms and registrations can still be targeted.
- Custom post types may require separate configuration, depending on the theme or plugin being used.
- Cached pages may still display comment forms temporarily, until the cache is cleared.
- WordPress Multisite installations may require comment settings to be configured individually for each site.
- A moderation strategy may be more beneficial than complete removal for websites that rely on community engagement.
- Theme-level customisations should only be performed by experienced users or developers to avoid unexpected issues.
Login to Domains.co.za Account
1. Go to the Domains.co.za website Account Login page.

2. Enter your Email and Password and click the Sign In button.
3. You will see the Domains.co.za Dashboard, displaying the Manage Account menu on the left and your Account Information, Account Overview and Open Support Tickets on the right.


