


This guide explains how to edit the header in WordPress using both the Site Editor and Theme Customiser. It also covers mobile header settings, header design best practices, troubleshooting common issues, and important checks to perform after making changes.
The header is one of the most important parts of any WordPress website. It is often the first thing visitors see when they arrive on your site and plays a major role in branding, navigation, usability, and trust. A well-designed header helps visitors quickly find important information, navigate between pages, contact your business, or take action such as requesting a quote, making a booking, or completing a purchase.
Depending on your WordPress theme, the header may contain your logo, site title, navigation menu, contact information, social media links, search functionality, call-to-action buttons, and other important elements. Modern WordPress themes provide a variety of ways to customise the header, ranging from beginner-friendly visual editors to more advanced code-based methods.
TABLE OF CONTENTS
What Is the Header in WordPress?
The header is the top section of a WordPress website that appears across multiple pages.
Depending on your theme, it may include:
- Your website logo.
- Site title and tagline.
- Navigation menu.
- Search function.
- Contact details.
- Social media icons.
- Call-to-action buttons.
- Shopping cart links.
- Login or account links.
The header is typically displayed on every page, making it one of the most visible parts of your website.
Why Your WordPress Header Matters
Your header affects how visitors interact with your website.
A well-organised header can:
- Strengthen your brand identity.
- Improve website navigation.
- Help visitors find important pages quickly.
- Increase trust and professionalism.
- Support mobile usability.
- Encourage visitors to act.
- Improve internal linking and content discoverability.
For South African businesses, the header often includes useful actions such as a phone number, WhatsApp button, booking link, or a quote request button.
Before You Begin
Before editing your header, ensure you have:
- WordPress administrator access.
- A current website backup.
- Your logo in an appropriate format.
- Updated site title and tagline information.
- List of pages to include in your menu.
- Brand colours and fonts.
- Mobile layout requirements.
- Access to a staging environment where possible.
- A clear understanding of the actions you want visitors to take.
Choose the Right Editing Method for Your Theme
The correct editing method depends on the WordPress theme installed on your website.
Use the Site Editor for Block Themes
Block themes support Full Site Editing and allow you to customise the header using blocks.
These themes typically use:
Appearance > Editor
Use the Theme Customiser for Classic Themes
Many traditional WordPress themes use the Theme Customiser.
These themes typically use:
Appearance > Customise
Header options may include logo settings, menu management, header layouts, colours, typography, and mobile-specific settings.
Check Your Theme Documentation
Header options vary between themes. If your theme settings differ from this guide, refer to the theme developer’s documentation for theme-specific instructions.
Method 1: Edit the Header with the WordPress Site Editor
This method is designed for block-based themes.
Step 1: Access Your Hosting Account
1. Login to the Domains.co.za Customer Portal using your account credentials.
2. Navigate to Manage Services from the dropdown menu.
3. Select your WordPress Hosting package and click Manage.
4. Click Login to cPanel to access your hosting control panel.
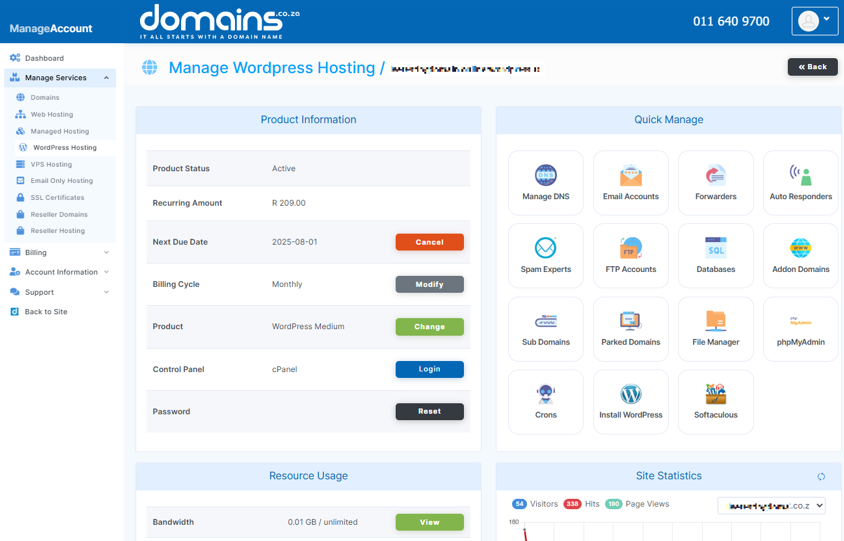
5. Open the WordPress Admin Dashboard.
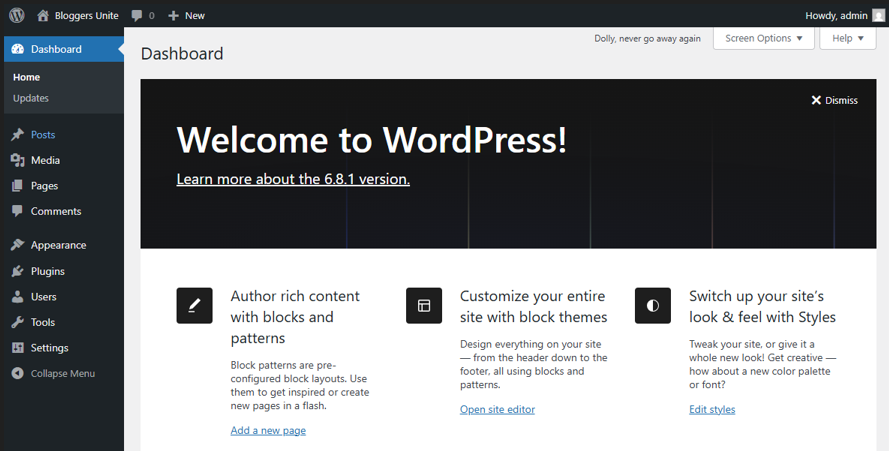
6. Select Appearance.
7. Click Editor.
Step 3: Find the Header Template Part
1. Open Patterns, Template Parts, or the relevant Header section depending on your WordPress version.
2. Locate the active header template used by your theme.
Step 4: Select the Header You Want to Edit
1. Click the header template.
2. Open it for editing.
Step 5: Use List View to Understand the Header Structure
1. Open List View from the editor toolbar.
2. Review the blocks that make up the header.
You may see blocks such as:
- Site Logo.
- Site Title.
- Navigation.
- Buttons.
- Search.
- Social Icons.
- Groups and Containers.
1. Select the Site Title block.
2. Edit the displayed title if required.
Alternatively, update the title through:
Settings > General
1. Select the Site Logo block.
2. Upload a new logo or choose an existing image from the Media Library.
3. Add meaningful alt text to improve accessibility.
Step 8: Edit the Navigation Menu
1. Select the Navigation block.
2. Add new menu items.
3. Remove unnecessary links.
4. Rearrange menu items.
5. Create dropdown menus if required.
Step 9: Add or Remove Header Blocks
1. Add optional blocks such as Search, Buttons, Social Icons, or Custom HTML.
2. Avoid overcrowding the header with unnecessary elements.
Step 10: Preview & Save Changes
1. Preview the header on desktop and mobile devices.
2. Review all changes carefully.
3. Click Save to publish the updates.
Method 2: Edit the Header with the Theme Customiser
This method is commonly used by classic WordPress themes.
Step 1: Access Your Hosting Account
1. Login to the Domains.co.za Customer Portal using your account credentials.
2. Navigate to Manage Services from the dropdown menu.
3. Select your WordPress Hosting package and click Manage.
4. Click Login to cPanel to access your hosting control panel.
5. Open the WordPress Admin Dashboard.
Step 2: Open the Theme Customiser
1. Open your WordPress Admin Dashboard.
2. Select Appearance.
3. Click Customise.
Step 3: Open Site Identity or Header Settings
1. Locate Site Identity, Header, Header Builder, or a similarly named section.
2. Open the relevant settings area.
Step 4: Change the Site Title & Logo
1. Upload or replace your logo.
2. Update the site title if required.
3. Configure the tagline.
4. Adjust logo size where the theme supports it.
Step 5: Update the Navigation Menu
1. Open the Menus section.
2. Create a new menu or edit an existing one.
3. Assign the menu to the appropriate header location.
Step 6: Customise the Header Layout & Style
Depending on the theme, you may be able to customise:
- Logo position.
- Menu alignment.
- Header height.
- Background colour.
- Typography.
- Button placement.
- Spacing and layout.
Step 7: Edit the Mobile Header
1. Review mobile-specific settings.
2.Configure the hamburger menu.
3. Adjust mobile logo sizing.
4. Configure any mobile call-to-action buttons.
5. Check menu alignment and usability.
1. Use the preview panel to review changes.
2. Test desktop and mobile layouts.
3. Click Publish when satisfied.
Should You Edit header.php Directly?
Directly editing the header.php file is generally recommended only for experienced developers.
Use a Child Theme for Code Changes
Changes made directly to a parent theme can be overwritten during updates.
A child theme allows you to preserve customisations when the theme is updated.
Back Up Before Editing Theme Files
Always create a complete website backup before making code-level changes.
Testing modifications on a staging site is strongly recommended.
Can You Use a Plugin to Edit the Header?
Yes. Some themes and plugins provide additional header-building functionality.
Examples include:
- Page builders.
- Header and footer builders.
- Theme-specific design plugins.
Before installing any plugin, verify compatibility, support availability, update frequency, and performance impact.
Tips for Creating an Effective WordPress Header
Keep the Header Simple
Too many links, buttons, banners, or icons can make navigation difficult.
Include the pages most important to your visitors, such as:
- Home.
- Services.
- Products.
- Pricing.
- About Us.
- Contact.
- Blog.
- Support.
Make Contact Actions Easy to Find
Consider including:
- Phone numbers.
- WhatsApp links.
- Request a Quote buttons.
- Booking links.
Use a Clear, High-Quality Logo
A professional logo helps establish trust and brand recognition.
Ensure the header remains easy to use on smaller screens and does not occupy excessive screen space.
Avoid Overloading the Header with Keywords
Navigation menus should prioritise usability rather than keyword stuffing.
What to Check After Editing Your Header
After saving your changes, verify that:
- The logo displays correctly.
- Menu links work properly.
- Dropdown menus function as expected.
- Call-to-action buttons work correctly.
- Phone and WhatsApp links function properly.
- Header displays correctly on mobile devices.
- The header does not overlap page content.
- Large images are not affecting page speed.
- Important pages remain easy to find.
- Your header appears correctly across different page templates.
- Any website cache has been cleared.
Troubleshooting Common Header Issues
- Header Changes Are Not Showing: Clear your website, browser, CDN, and server caches.
- Logo Appears Too Large or Blurry: Upload a higher-quality image and adjust logo sizing settings.
- Mobile Menu Is Not Opening: Check mobile menu settings and look for plugin conflicts.
- Menu Items Are Missing: Verify that the correct menu has been assigned to the header location.
- Header Overlaps Page Content: Review sticky header settings, spacing, and theme layout options.
- Sticky Header Is Behaving Incorrectly: Check theme settings and test for plugin conflicts.
- Site Editor Changes Affect More Pages Than Expected: Remember that header template parts are often shared across multiple templates.
- Theme Settings Differ from This Guide: Consult your theme documentation for theme-specific instructions.
- Cached Content Is Displaying an Older Header: Clear all caching systems and refresh the page.
Additional Information
- Editing the header does not usually affect your website content, posts, pages, or media files.
- Header settings and available options vary significantly between WordPress themes.
- Full Site Editing features require a compatible block theme.
- A staging environment is recommended when making major header changes to a live business website.
- Large logo files can negatively impact page loading times and should be optimised before uploading.
- Child themes provide a safer implementation method for custom code changes.
- Mobile header testing should be performed on multiple screen sizes whenever possible.
- Header-related plugins should be regularly updated to maintain security and compatibility.
- Navigation menus should focus on helping visitors find information quickly rather than including every available page.
- If you are unsure about theme-specific settings or advanced customisation, contact Domains.co.za Support or a qualified WordPress developer for assistance.
Login to Domains.co.za Account
1. Go to the Domains.co.za website Account Login page.

2. Enter your Email and Password and click the Sign In button.
3. You will see the Domains.co.za Dashboard, displaying the Manage Account menu on the left and your Account Information, Account Overview and Open Support Tickets on the right.


