


This guide explains the different ways to export a WordPress site and helps you choose the right method for your requirements.
If you run a WordPress website, there may come a time when you need to export your site. Whether you’re creating a backup, moving to a new hosting provider, building a staging environment, or preparing for a website redesign, exporting your WordPress site ensures you have a copy of your content and important website data.
For businesses, bloggers, online stores, and developers, knowing how to safely export a WordPress site can help prevent data loss and make future migrations much easier.
TABLE OF CONTENTS
What Does It Mean to Export a WordPress Site?
Exporting a WordPress site means creating a copy of some or all of your website’s content, files, and database information.
Depending on the method you choose, an export may include:
- Posts and pages.
- Images and media references.
- Comments.
- Menus.
- Custom content types.
- Themes and plugins.
- Website settings.
- The WordPress database.
It is important to understand the difference between exporting content and exporting a complete website.
The built-in WordPress export tool primarily exports content as an XML file, while a full website export includes both website files and the database.
Before You Begin
Before exporting your WordPress site, ensure you have:
- WordPress administrator access.
- Access to your hosting control panel.
- SFTP login details if required.
- Access to phpMyAdmin if performing a manual export.
- A secure location to store exported files.
- Sufficient storage space for backups.
If you are making major changes to your website, it is always a good idea to create a backup before updating plugins, changing themes, redesigning pages, or migrating to a new server.
Choose the Right Export Method
WordPress offers several ways to export website data.
| Method | Best For |
| Built-in WordPress Export Tool | Exporting content such as posts and pages |
| Migration Plugin | Full site backups and migrations |
| Hosting Control Panel Backup | Quick full or partial website backups |
| SFTP and phpMyAdmin | Advanced users requiring full control |
The right option depends on whether you need content only or a complete copy of your website.
Method 1: Export WordPress Content Using the Built-In Tool
The built-in WordPress export tool is ideal when you want to move or back up website content such as posts, pages, media references, comments, and menus.
Step 1: Login to Your WordPress Dashboard
1. Login to the Domains.co.za Customer Portal using your account credentials.
2. Navigate to Manage Services from the dropdown menu.
3. Select your WordPress Hosting package and click Manage.
4. Click Login to cPanel to access your hosting control panel.
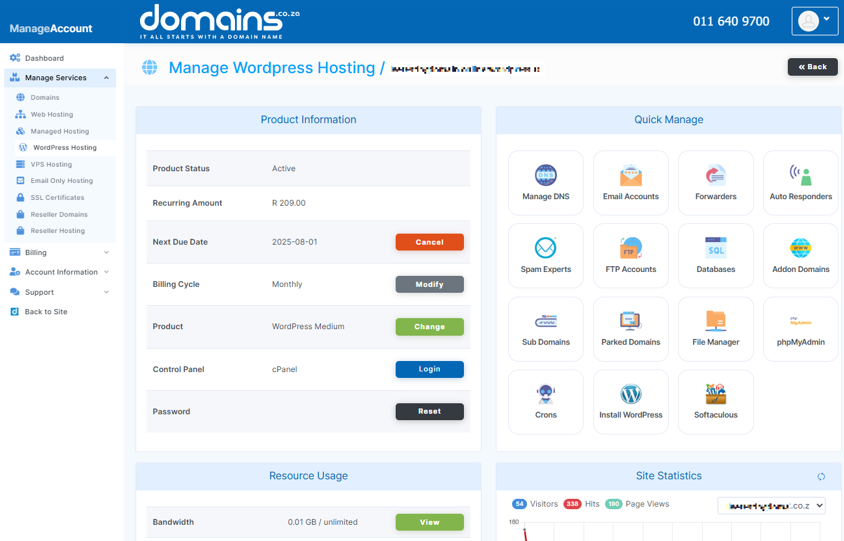
5. In cPanel, locate and open WordPress Manager.

6. Access your WordPress admin area.
Step 2: Go to Tools > Export
From the left-hand menu, navigate to:
Tools > ExportWordPress will open the Export screen.
Step 3: Choose What You Want to Export
You can choose from:
- All content.
- Posts.
- Pages.
- Media.
- Custom content types created by plugins.
Select the option that best suits your requirements.
Step 4: Download & Save the Export File
Click Download Export File.
WordPress will generate an XML file and download it to your computer.
An XML file is a structured data file that contains your exported content and settings references.
Store this file securely, as it may contain important website information.
Method 2: Export a Private WordPress Site
If your website is set to private or hidden from search engines, you can still export the file using the built-in export tool or a migration plugin.
In some situations, certain third-party migration tools may require temporary public access to complete a transfer.
If this is necessary:
- Only make the site public for the shortest possible time.
- Complete the export immediately.
- Switch the website back to private as soon as the process is finished.
Always review your privacy settings after exporting to ensure your website remains protected.
Method 3: Export a Full Site Using a Migration Plugin
Migration and backup plugins can export both your website files and database into downloadable packages.
Popular migration plugins include tools such as Duplicator and similar WordPress backup solutions.
Step 1: Install & Activate the Plugin
Navigate to:
Plugins > Add NewSearch for your preferred migration plugin and install it.
Always choose reputable plugins that are actively maintained and regularly updated.
Step 2: Create a New Backup or Package
Open the plugin settings and create a new backup package.
The plugin will collect:
- Website files.
- Themes.
- Plugins.
- Uploads.
- Database information.
Step 3: Scan, Build, & Download the Package
Most migration plugins perform a scan before building the package.
Review any warnings or errors carefully.
Once the package has been created:
- Download all generated files.
- Save them securely.
- Verify that the download completed successfully.
These files can usually be used for migrations, cloning, or disaster recovery.
Method 4: Export Your Site Through Your Hosting Control Panel
Many hosting accounts include backup tools that allow you to create full or partial website backups.
If your website is hosted with Domains.co.za:
- Login to the Domains.co.za Customer Portal.
- Open Manage Services.
- Select your hosting service.
- Access your hosting control panel.
- Open the available backup tools.
- Create a full or partial backup as required.
- Download the backup files to a secure location.
This method is often one of the easiest ways to create a complete website backup because it includes both website files and database information.
If you are unsure which backup option to use, contact Domains.co.za support for assistance.
Method 5: Manually Export WordPress Using SFTP & phpMyAdmin
This method is recommended for advanced users who require full control over the export process.
Step 1: Download Website Files Using SFTP
SFTP (Secure File Transfer Protocol) allows you to connect to your hosting account and download website files securely.
Using an SFTP client:
- Connect to your hosting account.
- Navigate to your WordPress installation directory.
- Download important folders, including:
wp-content
wp-admin
wp-includes.
Remember that SFTP only downloads files and does not export your database.
Step 2: Export the Database Using phpMyAdmin
The WordPress database contains:
- Posts.
- Pages.
- Comments.
- User accounts.
- Plugin settings.
- Form submissions.
- Website configuration data.
To export it:
- Login to phpMyAdmin through your hosting control panel.
- Select your WordPress database.
- Click Export.
- Choose the Quick export method if appropriate.
- Select SQL format.
- Click Go to download the database file.
For a complete manual backup, you need both the website files and the database export.
Where to Store Your Exported WordPress Files
After exporting your website, store your files securely.
Good storage options include:
- A dedicated backup folder on your computer.
- An external hard drive.
- Secure cloud storage services.
- Business backup platforms.
- Multiple backup locations for added protection.
Avoid storing your only backup copy on the same server as your website.
Follow the 3-2-1 backup principle, which includes three copies, two storage types, and one offsite copy. This can help improve data protection.
You’re All Set
Exporting a WordPress site is an important part of website maintenance, disaster recovery, and migration planning. Whether you use the built-in WordPress export tool, a migration plugin, your hosting control panel, or manual methods such as SFTP and phpMyAdmin, choosing the right approach helps ensure your data remains safe and accessible.
Regular exports and backups can help protect your website from unexpected issues and make future migrations much easier. If you’re unsure which export method is right for your website, contact Domains.co.za support for assistance. You can also explore WordPress Hosting, Web Hosting, VPS Hosting, SSL Certificates, Domain Registration, and other website solutions from Domains.co.za to help keep your website secure and reliable.
Login to Domains.co.za Account
1. Go to the Domains.co.za website Account Login page.

2. Enter your Email and Password and click the Sign In button.
3. You will see the Domains.co.za Dashboard, displaying the Manage Account menu on the left and your Account Information, Account Overview and Open Support Tickets on the right.


