





This guide explains how to setup WordPress Multisite network, choose between subdomains and subdirectories, configure the required files, and manage sites, users, themes, and plugins across the network.
Managing multiple WordPress websites can quickly become complicated when each site requires its own WordPress installation, updates, themes, plugins, users, and maintenance schedule. WordPress Multisite offers a powerful solution by allowing you to create and manage multiple related websites from a single WordPress installation.
A WordPress Multisite network enables administrators to control a collection of websites from one central dashboard while sharing WordPress core files, themes, plugins, and server resources. This can simplify administration for organisations managing multiple locations, departments, brands, franchises, schools, universities, or related microsites.
TABLE OF CONTENTS
IMPORTANT:
WordPress Multisite is more complex than a standard WordPress installation. Before making any changes, ensure you have a complete backup of your WordPress website files and database
What Is WordPress Multisite?
WordPress Multisite is a feature built into WordPress that allows you to create and manage multiple websites from a single WordPress installation.
Instead of maintaining separate WordPress installations for each website, you can manage all sites from one network dashboard while sharing the same WordPress core files and database structure.
Examples include:
- A university that manages websites for different faculties.
- A franchise business managing branch websites.
- A company managing regional office websites.
- An agency managing a network of related client websites.
- A business operating multiple brand microsites.
How WordPress Multisite Is Different from a Single WordPress Site
A standard WordPress installation manages one website.
A WordPress Multisite installation manages multiple websites from one WordPress installation.
With Multisite:
- All sites share the same WordPress core files.
- Themes can be installed once and used across the network.
- Plugins can be centrally managed.
- User accounts can be shared across sites.
- Network-wide settings can be managed centrally.
Because resources are shared, issues on one site can potentially affect the wider network if not managed correctly.
When Should You Use WordPress Multisite?
WordPress Multisite works particularly well for:
- Schools and universities.
- Franchise businesses.
- Multi-location companies.
- Government departments.
- Internal company departments.
- Brand microsites.
- Blog networks.
- Agencies managing related websites.
When WordPress Multisite May Not Be the Best Option
Multisite may not be suitable for:
- Completely unrelated websites.
- Independent client projects.
- Websites requiring separate hosting environments.
- Sites that require significantly different themes or plugins.
- Projects where one site’s performance should not impact another.
In these cases, separate WordPress installations may be the better choice.
Before You Begin
Before configuring WordPress Multisite, ensure you have:
- WordPress administrator access.
- Access to your Domains.co.za hosting account.
- File Manager, FTP, or SFTP access.
- Access to the wp-config.php file.
- Access to the .htaccess file where applicable.
- A recent full website backup.
- A decision on whether to use subdomains or subdirectories.
- DNS management access if using subdomains.
- SSL certificate planning for all websites in the network.
- A clean permalink structure.
Important Safety Notes Before Enabling Multisite
Enabling Multisite changes the way WordPress operates and stores website information.
Before proceeding:
- Create a full backup of your website files.
- Create a complete database backup.
- Verify that your backup can be restored if required.
- Document your current configuration.
- Schedule maintenance during a low-traffic period if possible.
How To Setup WordPress Multisite
Step 1: Back Up Your WordPress Website
1. Login to the Domains.co.za Customer Portal using your account credentials.
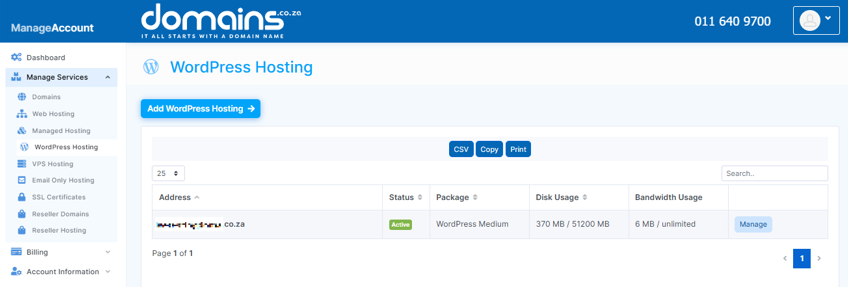
2. Navigate to Manage Services from the dropdown menu.
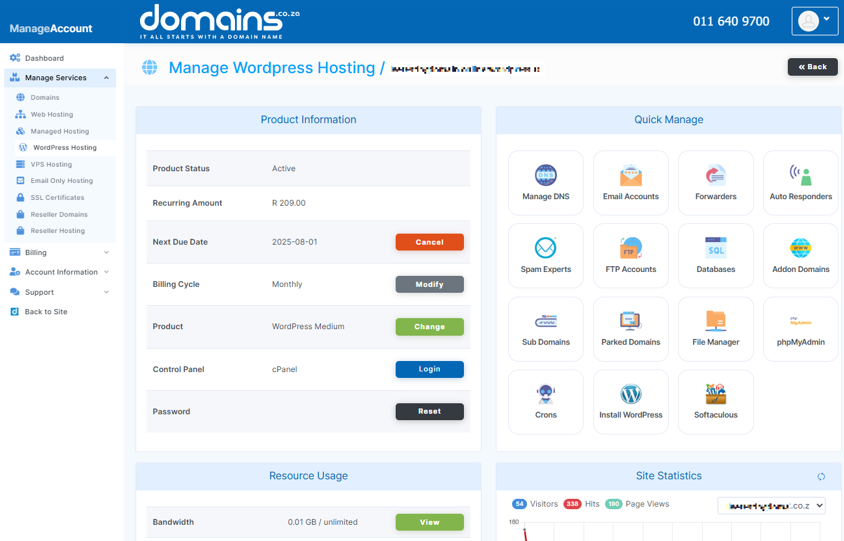
3. Select your WordPress Hosting package and click Manage.
4. Click Login to cPanel to access your hosting control panel.
5. Open Backup or your preferred backup solution and create a complete backup of your website files and database.
6. Verify that the backup process completed successfully before continuing.
Step 2: Deactivate Active Plugins Temporarily
1. Login to your WordPress Dashboard.
2. Navigate to Plugins > Installed Plugins.
3. Select all active plugins.
4. Choose Deactivate from the Bulk Actions menu.
5. Click Apply.
This helps minimise conflicts during the Multisite setup process.
Step 3: Enable Multisite in wp-config.php
1. Return to cPanel.
2. Open File Manager.
3. Navigate to your WordPress installation directory.
4. Locate the wp-config.php file.
5. Edit the file carefully.
6. Add the following line immediately above the line that says “That’s all, stop editing”:
define( 'WP_ALLOW_MULTISITE', true );7. Save your changes.
This enables the Network Setup option within WordPress
Step 4: Open Network Setup in WordPress
1. Login to WordPress once more.
2. Navigate to Tools > Network Setup.
3. Review the information presented by WordPress before continuing.
Step 5: Choose Subdomains or Subdirectories
WordPress will ask you to choose a network structure.
EXAMPLE:

johannesburg.example.co.za
cape-town.example.co.za
Subdomains work well for:
- Franchise branches.
- Regional offices.
- Department websites.
- Semi-independent sites.
You may need wildcard DNS records or individual DNS records, depending on your setup.
When to Choose Subdirectories
EXAMPLE:

example.co.za/johannesburg
example.co.za/cape-town
Subdirectories are often ideal for:
- Smaller website networks.
- Department sections.
- Content hubs.
- Related microsites.
Step 6: Enter the Network Title & Admin Email
1. Enter a descriptive network title.
2. Enter the email address of the person responsible for managing the network.
3. Click Install.
Step 7: Add the Generated Code to wp-config.php & .htaccess
After installation, WordPress will generate a configuration code.
1. Copy the code provided by WordPress.
2. Open wp-config.php again.
3. Paste the generated Multisite settings exactly as provided.
These typically include:
MULTISITE
SUBDOMAIN_INSTALL
DOMAIN_CURRENT_SITE
PATH_CURRENT_SITE
SITE_ID_CURRENT_SITE
BLOG_ID_CURRENT_SITE
Update .htaccess
1. Open the .htaccess file in your WordPress root directory.
2. Replace the existing WordPress rewrite rules with the Multisite rules supplied by WordPress.
3. Save the file.
NOTE:
The .htaccess file is commonly used on Apache-based hosting environments and may not apply to every single server configuration.
Step 8: Log Back into WordPress
1. Sign out of WordPress.
2. Login again, using your administrator credentials.
3. Confirm that the Multisite menu options appear.
Step 9: Open the Network Admin Dashboard
1. Locate My Sites in the top administration bar.
2. Select Network Admin.
The Network Admin area allows you to manage:
- Sites.
- Users.
- Themes.
- Plugins.
- Network settings.
Step 10: Add a New Site to the Network
1. Navigate to Network Admin > Sites.
2. Click Add New.
3. Enter the site address.
4. Enter the site title.
5. Select the preferred language.
6. Enter the administrator email address.
7. Click Add Site.
Step 11: Manage Themes Across the Network
1. Navigate to Network Admin > Themes.
2. Install themes as required.
3. Enable themes for network use where appropriate.
4. Allow individual sites to use approved themes.
Only install trusted and well-maintained themes.
Step 12: Manage Plugins Across the Network
1. Navigate to Network Admin > Plugins.
2. Install required plugins.
3. Decide whether each plugin should be:
- Network activated.
- Activated on specific sites only.
- Available for site administrators to activate.
Avoid network-activating every plugin on the network, unless it is genuinely required across all sites.
Step 13: Manage Users & Roles
The Super Admin controls:
- The entire network.
- Site creation.
- User management.
- Theme management.
- Plugin management.
- Network settings.
A Site Admin manages:
- A single site within the network.
- Site content.
- Site settings permitted by the Super Admin.
- Site-specific users.
Their permissions are limited compared to a Super Admin.
Step 14: Configure DNS, Domains, & SSL
If you are using subdomains or custom domains:
- Configure the required DNS records.
- Ensure domain mappings are configured correctly.
- Install SSL certificates where required.
- Confirm that HTTPS loads correctly on every site.
Incorrect DNS or SSL settings can prevent sites from loading properly.
Step 15: Test the Multisite Network
Before launching the network:
- Test every subsite.
- Verify administrator logins.
- Check SSL certificates.
- Test forms and contact pages.
- Confirm permalink functionality.
- Review plugin compatibility.
- Verify theme functionality.
- Test navigation menus.
- Confirm user permissions.
Troubleshooting Common WordPress Multisite Issues
- Confirm that the WP_ALLOW_MULTISITE line was added correctly.
- Clear browser and WordPress caches.
- Verify DNS records.
- Confirm wildcard DNS configuration if required.
- Review permalink settings.
- Verify Multisite rewrite rules.
- Check WordPress URL settings.
- Verify SSL configuration.
- Restore from backup if necessary.
- Reapply the generated WordPress rules carefully.
- Disable recently activated plugins.
- Test compatibility with Multisite.
- Use themes that explicitly support Multisite environments.
- Verify SSL installation for every domain or subdomain.
- Check certificate validity.
- Review DNS settings.
- Confirm mapped domains point to the correct hosting account.
Your WordPress Multisite network is now configured and ready to host multiple websites from a single WordPress installation.
Remember to:
- Keep regular backups of your network.
- Monitor hosting resource usage.
- Test updates before applying them network-wide.
- Keep themes and plugins regularly updated.
- Monitor security across all sites.
- Document configuration changes for future reference.
Because Multisite networks can be more demanding than standard WordPress installations, larger networks may benefit from upgraded hosting resources such as VPS hosting.
If you are unsure about DNS configuration, SSL certificates, server settings, or WordPress file modifications, contact Domains.co.za Support or consult a qualified WordPress developer before making further changes.
Additional Information
- WordPress Multisite allows multiple websites to share a single WordPress installation while maintaining separate content and settings for each site.
- All websites within the network share the same WordPress core files, which simplifies updates and maintenance.
- Multisite networks can consume more hosting resources than a standard single-site WordPress installation.
- Subdomains typically require additional DNS configuration, while subdirectories are often simpler to implement.
- Backups and restorations can be more complex in a Multisite environment because multiple websites share the same installation.
- Not every WordPress plugin is fully compatible with Multisite, so compatibility testing is recommended before deployment.
- SSL certificates should be configured correctly for every domain or subdomain used within the network.
- Major updates should be tested carefully because changes can affect all websites within the network.
- Super Admin accounts should be secured with strong passwords and multi-factor authentication where available.
- Regular performance monitoring can help identify resource bottlenecks as your network grows.
Login to Domains.co.za Account
1. Go to the Domains.co.za website Account Login page.

2. Enter your Email and Password and click the Sign In button.
3. You will see the Domains.co.za Dashboard, displaying the Manage Account menu on the left and your Account Information, Account Overview and Open Support Tickets on the right.


