






This guide explains WooCommerce shortcodes, where to add them, and how to use some of the most common examples on your WordPress website.
WooCommerce makes it easy to build and manage an online store with WordPress, and when it’s paired with reliable WordPress hosting, it provides a powerful platform for selling products and services online. One of its most useful features is support for shortcodes, which allow you to display products, shopping carts, customer account pages, and other store functions anywhere on your website without needing to write custom code.
Whether you run a local online shop, service-based business, or ecommerce startup, WooCommerce shortcodes can help you customise your store layout and improve the shopping experience for your customers.
TABLE OF CONTENTS
What Are WooCommerce Shortcodes?
WooCommerce shortcodes are small snippets of text placed inside square brackets that tell WordPress to display specific WooCommerce content or functionality on a page or post.
Example:
[products]
When WordPress loads the page, WooCommerce replaces the shortcode with the appropriate content, such as a product grid, shopping cart, checkout page, or customer account area.
Shortcodes provide a simple way to add WooCommerce features without editing code or creating custom templates.
Before You Begin
Before working with WooCommerce shortcodes, ensure you have:
- A WordPress website.
- WooCommerce installed and activated.
- Products added to your store.
- Administrator access to WordPress.
- A recent backup of your website if you are editing an existing live store.
It is also a good idea to preview changes before publishing them to visitors.
How To Use WooCommerce Shortcodes
Step 1: Check That WooCommerce Is Installed
1. Login to the Domains.co.za Customer Portal using your account credentials.
2. Navigate to Manage Services from the dropdown menu.
3. Select your WordPress Hosting package and click Manage.
4. Click Login to cPanel to access your hosting control panel.
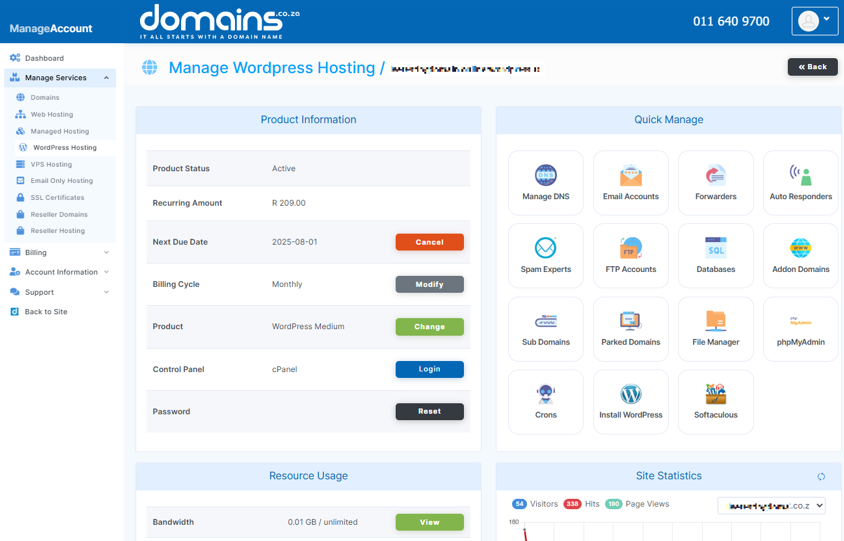
5. In cPanel, locate and open WordPress Manager.

6. Login to your WordPress Dashboard.
7. Navigate to Plugins > Installed Plugins.
8. Locate WooCommerce in the plugin list.
9. Confirm that the plugin is installed and marked Active.
10. If WooCommerce is not installed, install and activate it before continuing.
Most WooCommerce shortcodes will not work if the plugin is disabled.
Step 2: Add a Shortcode to a Page or Post
1. In WordPress, open an existing page or post, or create a new WordPress blog post.
2. Place your cursor where you want the WooCommerce content to appear.
3. Add a Shortcode Block if you are using the Block Editor or paste the shortcode directly into the content area.
4. Enter the WooCommerce shortcode.
5. Save or update the page.
6. Preview the page to confirm that the content displays correctly.
Always test the page before publishing it to customers.
Step 3: Display Products with the Products Shortcode
The [products] shortcode is one of the most flexible WooCommerce shortcodes available.
It allows you to display products anywhere on your website, making it useful for homepages, landing pages, promotions, and category pages.
Show a Limited Number of Products
You can limit the number of products displayed using the limit attribute.
Example:
[products limit="4"]
This shortcode displays four products.
You can organise products into columns using the columns attribute.
Example:
[products limit="4" columns="2"]
This displays four products arranged in two columns.
Show Products from a Specific Category
You can display products from a particular category.
Example:
[products category="clothing"]
Replace “clothing” with your own product category slug.
Other useful attributes include:
- orderby – Controls how products are sorted.
- order – Sets ascending or descending order.
- limit – Controls how many products appear.
- columns – Controls the number of columns displayed.
- category – Filters products by category.
Example:
[products category="accessories" limit="6" columns="3" orderby="date" order="DESC"]
Step 4: Add Store Page Shortcodes
WooCommerce includes several important shortcodes that power key store functions.
The cart shortcode displays the customer’s shopping cart.
[woocommerce_cart]This shortcode is typically used on your Cart page.
The checkout shortcode displays the checkout process.
[woocommerce_checkout]This shortcode is normally used on your Checkout page.
The My Account shortcode creates a customer account area where users can manage orders, addresses, and account details.
[woocommerce_my_account]Most stores use this shortcode on a dedicated My Account page.
The order tracking shortcode allows customers to check the status of their orders.
[woocommerce_order_tracking]This can help reduce customer support requests by allowing shoppers to track orders themselves.
Step 5: Add an Add to Cart Button
WooCommerce also allows you to display an Add to Cart button for a specific product.
Example:
[add_to_cart id="123"]
Replace “123” with the product’s actual ID.
1. Go to Products in WordPress.
2. Hover over the product name.
3. The product ID will appear beneath the product title or within the URL preview.
4. Copy the ID and replace it in the shortcode.
This shortcode is useful for promotional pages, special offers, and product-focused landing pages.
Step 6: Use Shortcode Attributes Carefully
Attributes are settings added inside a shortcode that control how content appears.
Example:
[products limit="8" columns="4"]
In this example:
- limit=”8″ displays eight products.
- columns=”4″ displays them across four columns.
Always double-check attribute names, quotation marks, and values. Even a small typo can prevent the shortcode from working correctly.
Step 7: Troubleshoot Common Shortcode Problems
If a WooCommerce shortcode is not displaying correctly, check the following:
- Ensure the shortcode includes opening and closing square brackets.
- Confirm quotation marks are entered correctly.
- Verify that WooCommerce is installed and active.
- Check that the product, category, or ID referenced exists.
- Temporarily disable other plugins to identify possible plugin conflicts.
- Test with a WooCommerce-compatible theme to rule out theme conflicts.
- Update WordPress, WooCommerce, plugins, and themes to the latest versions.
- Confirm your website is running a supported PHP version.
- Clear any website, browser, or caching plugin caches.
If problems persist, contact your hosting provider or website developer for assistance.
Best Practices for Using WooCommerce Shortcodes
To get the best results from WooCommerce shortcodes:
- Use shortcodes only where they add value to the customer experience.
- Avoid placing too many product displays on a single page.
- Keep layouts clean and easy to navigate.
- Preview pages before publishing.
- Test your store regularly after making changes.
- Ensure your theme is WooCommerce compatible.
- Review mobile responsiveness after adding new content.
Most importantly, test critical customer journeys, including:
- Product pages.
- Shopping cart functionality.
- Checkout process.
- Payment flow.
- Customer account pages.
- Order tracking pages.
This helps ensure customers can complete purchases without issues.
You’re All Set
WooCommerce shortcodes provide a simple and effective way to add store functionality throughout your WordPress website. Whether you’re displaying products, creating a checkout page, or adding customer account features, shortcodes help you customise your store without needing advanced coding skills.
For the best performance and reliability, consider using WordPress Hosting from Domains.co.za for your WooCommerce store. You can also explore Web Hosting, Domain Registration, SSL Certificates, and Email Hosting solutions to help build a secure and professional website.
Login to Domains.co.za Account
1. Go to the Domains.co.za website Account Login page.

2. Enter your Email and Password and click the Sign In button.
3. You will see the Domains.co.za Dashboard, displaying the Manage Account menu on the left and your Account Information, Account Overview and Open Support Tickets on the right.


