


This guide explains how WordPress version control works, the tools available, and how to safely implement version control as part of your website management workflow.
Managing changes to a WordPress website can become challenging as a site grows, particularly when multiple developers, designers, content creators, or administrators are involved. A single coding error, plugin update, or theme modification can often cause unexpected issues that affect functionality, performance, or the user experience.
Version control provides a safer and more organised way to manage website development. It allows you to track changes to files, review previous versions, collaborate with team members, and roll back changes when necessary. Rather than making modifications directly on a live website, version control creates a structured workflow that helps reduce errors and improves accountability.
For WordPress websites, version control is commonly used for custom themes, plugins, and development projects. While WordPress includes a built-in revisions feature for posts and pages, version control systems such as Git provide significantly more control over code and file management.
TABLE OF CONTENTS
What Is WordPress Version Control?
Version control is a system that records changes made to files over time. It allows developers and website administrators to review previous versions, compare changes, restore earlier states, and collaborate more effectively.
For WordPress websites, version control is typically used to track:
- Custom theme files.
- Custom plugin files.
- CSS and JavaScript files.
- Configuration files used during development.
- Other custom code and development assets.
Version control generally does not track live database content, customer information, orders, or uploaded media files, unless specific workflows are configured.
WordPress Version Control vs WordPress Revisions
Although they serve similar purposes, WordPress Revisions and version control are different.
WordPress Revisions track changes made to posts and pages within the WordPress dashboard.
Version control tracks code and file changes, including:
- Theme development.
- Plugin development.
- CSS customisations.
- JavaScript changes.
- Configuration updates.
Version control provides much more detailed tracking and rollback capabilities than standard WordPress revisions.
When Should You Use Version Control?
Version control is particularly useful for:
- Custom theme development.
- Custom plugin development.
- Agency and team workflows.
- Staging-to-live deployments.
- Websites that receive frequent code updates.
- Client websites with multiple contributors.
- Safer recovery after failed updates.
For simple brochure websites with minimal customisation, version control may be unnecessary, but it becomes increasingly valuable as website complexity grows.
Before You Begin
Before implementing version control, ensure you have:
- WordPress administrator access.
- Hosting account access.
- File Manager, SFTP, or SSH access.
- A recent full website backup.
- A staging environment where possible.
- A local development environment if using Git.
- Git installed on your computer if required.
- A GitHub, GitLab, or Bitbucket account if using a remote repository.
- A basic understanding of WordPress themes, plugins, and file management.
Important Safety Notes
Before setting up version control, consider the following:
- Version control is not a replacement for website backups.
- Database content is typically managed separately from code repositories.
- Uploaded media files often require separate backup strategies.
- Customer information should never be stored in public repositories.
- Sensitive credentials should never be committed to version control systems.
- Protect live websites using backups and staging environments before deployment.
Choosing the Right Version Control Solution
Different tools suit different levels of technical expertise.
- Git: Git is the most widely used version control system for developers. It tracks changes, stores version history, and enables collaboration.
- GitHub, GitLab, and Bitbucket: These platforms store Git repositories remotely and provide collaboration, version history, and deployment capabilities.
- WP Pusher: WP Pusher allows WordPress themes and plugins to be deployed directly from Git repositories. While it remains a useful option for some workflows, many developers now prefer native CI/CD pipelines using GitHub Actions, GitLab CI/CD, or hosting platforms with built-in Git deployment capabilities for greater flexibility and automation.Git repositories without requiring a fully customised deployment process.
- Git-Based Deployment Tools: Modern deployment workflows often use GitHub Actions, GitLab CI/CD, Buddy, DeployBot, or similar automation platforms to deploy code via SFTP, SSH, or Git integration. Many hosting providers also offer native Git deployment features, making automated deployments more flexible and easier to integrate into development workflows. Always verify compatibility, security requirements, and deployment settings before implementing an automated pipeline.Git repositories to WordPress hosting environments. Always verify compatibility, features, and support before selecting a deployment tool.
- WP Rollback: WP Rollback is not a complete version control solution. Instead, it allows users to roll back supported WordPress.org plugins and themes to previous versions when an update causes issues.
Method 1: Setup Git for a WordPress Theme or Plugin
This is the standard workflow used by developers.
Step 1: Access Your Hosting Control Panel
1. Login to the Domains.co.za Customer Portal using your account credentials.
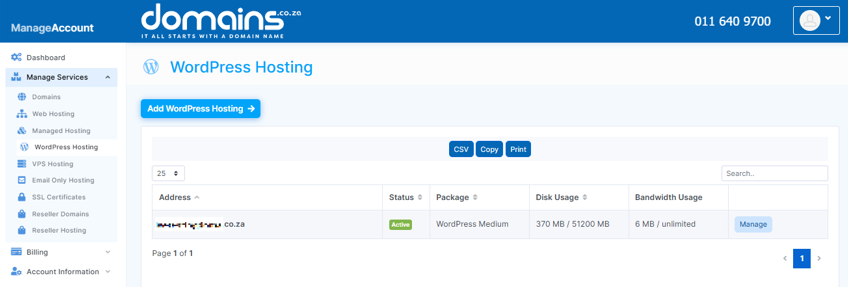
2. Navigate to Manage Services from the dropdown menu.
3. Select your WordPress Hosting package and click Manage.
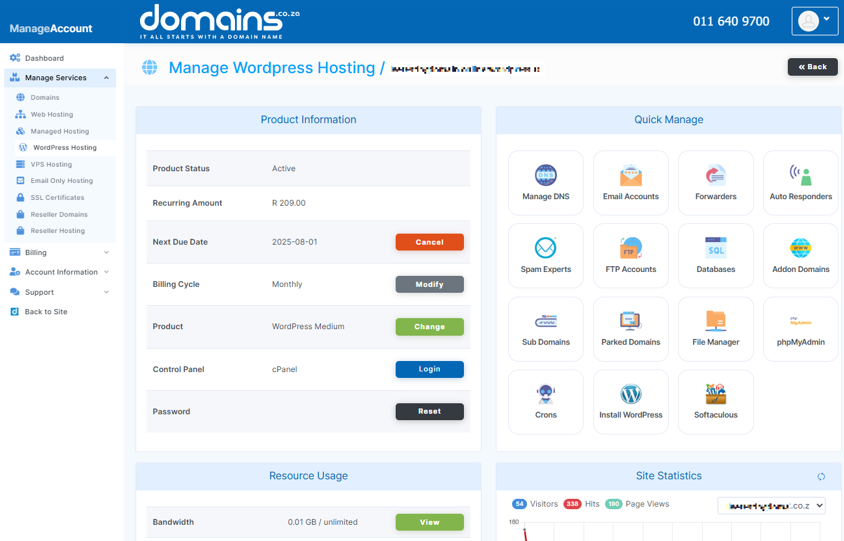
4. Click Login to cPanel to access your hosting control panel.
Step 2: Setup a Local Development Environment
Create a local or staging version of your WordPress website before making development changes.
Avoid editing production websites directly whenever possible.
Install Git on your local computer so version control commands can be used.
Rather than tracking the entire WordPress installation, most developers focus on:
- Custom themes.
- Custom plugins.
- Custom functionality.
This approach keeps repositories smaller and easier to manage.
Step 5: Create a .gitignore File
A .gitignore file tells Git which files should not be tracked.
Common exclusions include:
- Uploads folders.
- Cache files.
- Backup files.
- Log files.
- Environment files.
- Sensitive credentials.
Step 6: Initialise the Repository
Use Git to initialise a repository within the project folder.
This creates a version-controlled environment for tracking future changes.
Create commits whenever meaningful changes are made.
Each commit acts as a checkpoint that can be reviewed or restored later.
Step 8: Push the Repository to a Remote Platform
Upload the repository to GitHub, GitLab, or Bitbucket.
Remote repositories provide collaboration, off-site storage, and deployment options.
Method 2: Use WP Pusher for Git-Based DeploymentsMethod 2: Use WP Pusher for Git-Based Deployments
WP Pusher remains a convenient deployment tool for many WordPress users, particularly those who prefer managing themes and plugins directly from Git repositories within the WordPress dashboard. However, larger development teams and professional workflows increasingly use CI/CD platforms such as GitHub Actions or GitLab CI/CD for automated deployments.
1. Login to the Domains.co.za Customer Portal using your account credentials.
2. Navigate to Manage Services from the dropdown menu.
3. Select your WordPress Hosting package and click Manage.
4. Click Login to cPanel to access your hosting control panel.
5. Open the WordPress Admin Dashboard.
Step 2: Install WP Pusher
Install and activate WP Pusher after reviewing its documentation, compatibility, and licence requirements.
Step 3: Connect Your Repository
Connect GitHub, GitLab, or Bitbucket to WP Pusher.
This allows WordPress to retrieve code directly from the repository.
Step 4: Deploy Themes or Plugins
Deploy approved theme and plugin updates from the repository to the website.
Verify that:
- The website loads correctly.
- Forms function properly.
- Administrative areas work as expected.
- Theme functionality remains intact.
Method 3: Use WP Rollback
WP Rollback provides a simple way to revert supported WordPress.org plugins and themes.
Create a full backup before performing any rollback operation.
1. Login to the Domains.co.za Customer Portal.
2. Open the Manage Services drop-down menu.
3. Select Web Hosting.
4. Click Manage next to the hosting package associated with your domain.
5. Click Login next to Control Panel to access cPanel.
6. Open the WordPress Admin Dashboard.
Install and activate the WP Rollback plugin after verifying compatibility and support.
Step 4: Select a Previous Version
Choose the plugin or theme version you wish to restore.
Select a known stable version wherever possible.
Review all critical functionality after the rollback is completed.
Best Practices for WordPress Version Control
- Use Staging Before Deployment: Always test changes in a staging environment before deploying to a live website.
- Commit Small Changes: Smaller commits make troubleshooting and rollbacks easier.
- Write Clear Commit Messages: Describe exactly what was changed and why.
- Protect Sensitive Information: Never commit Passwords, API keys, Customer data, Database exports, or Live wp-config.php credentials.
- Maintain Separate Backups: Version control tracks code changes, while backups protect files, databases, and website content. Both are essential.
What to Test Before & After Deployments
After every deployment or rollback, test:
- Homepage functionality.
- Key service pages.
- Contact forms.
- Quote request forms.
- Booking systems.
- WooCommerce cart and checkout pages.
- Login functionality.
- Administrative dashboards.
- Mobile responsiveness.
- Analytics and tracking scripts.
- Error logs.
Troubleshooting Common Version Control Issues
Common challenges include:
- Repositories containing unnecessary files.
- Sensitive information being committed accidentally.
- Deployment processes overwriting live changes.
- Plugin or theme compatibility issues after rollback.
- Merge conflicts between contributors.
- File permission errors.
- Missing Git installations.
- Remote authentication failures.
When to Contact a Developer or Domains.co.za Support
You should seek assistance if:
- Deployments repeatedly fail.
- SSH or SFTP access is unavailable.
- File permission problems occur.
- The live website is inaccessible.
- Database-related issues arise.
- WooCommerce checkout functionality is affected.
- You are uncertain about Git workflows or deployment processes.
Additional Information
- Version control is designed to track code changes rather than live database content.
- Git is the industry-standard version control system used by most WordPress developers.
- Remote repositories provide additional protection by storing code history away from the hosting environment.
- WP Rollback is a rollback tool and should not be considered a replacement for Git.
- Staging environments help identify issues before changes reach a live website.
- Version control and backups serve different purposes and should always be used together.
- Large repositories can become difficult to manage if uploads, backups, and cache files are included.
- Proper use of .gitignore helps keep repositories secure and efficient.
- Sensitive credentials should always be excluded from repositories.
Login to Domains.co.za Account
1. Go to the Domains.co.za website Account Login page.

2. Enter your Email and Password and click the Sign In button.
3. You will see the Domains.co.za Dashboard, displaying the Manage Account menu on the left and your Account Information, Account Overview and Open Support Tickets on the right.


