


The following article explain how to access WP Toolkit through cPanel and create a clone a website.Cloning a WordPress website creates a separate copy of an existing WordPress installation. This can be useful when you wish to create a development or staging environment, test updates, experiment with design changes or create a copy of an existing website for another purpose.
Instead of manually copying WordPress files and databases, WP Toolkit provides tools that can simplify the process. A cloned website can contain the WordPress core files, themes, plugins, media and database content from the original installation, depending on the options selected during the cloning process.
Cloning is particularly useful when making significant changes to an existing website. You can work on the cloned copy without immediately affecting the live website, allowing you to test changes before deploying them.
A clone is an independent copy of a WordPress installation. Changes made to the cloned website do not automatically affect the original website.
Before cloning a website, consider where the cloned website will be hosted and whether it will use a subdomain, separate domain or another location within the hosting account. You should also consider whether the clone will be publicly accessible and whether it contains information that should remain private.
TABLE OF CONTENTS
How to Clone a Website in WP Toolkit
1. Login to the Domains.co.za Customer Portal.
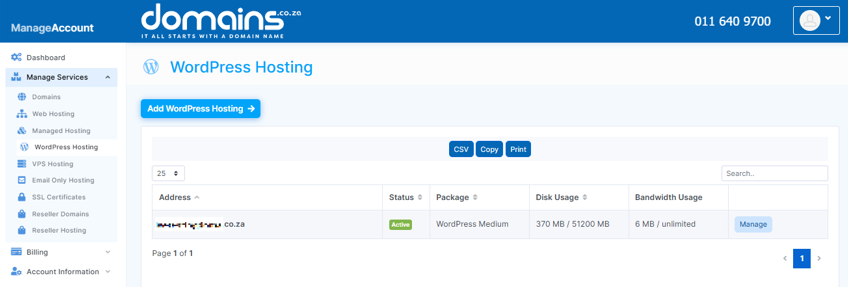
2. Open the Manage Services dropdown menu.
3. Choose Web Hosting or WordPress Hosting from the available options.
4. Click Manage next to the domain associated with your WordPress Hosting package.
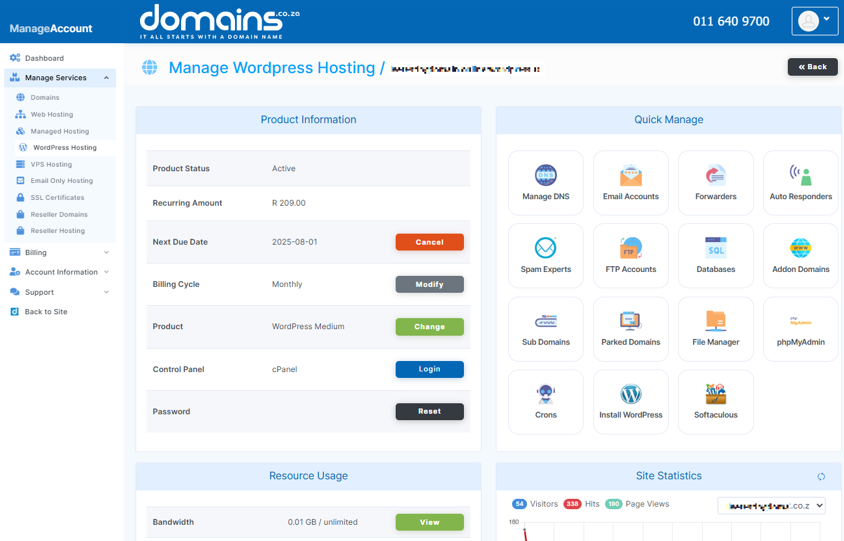
5. Click Login next to Control Panel to access cPanel.
6. Open WP Toolkit from within cPanel.
7. Locate your WordPress installation and open its management options.
8. Select the option to Clone the WordPress installation.
9. Choose the destination for the cloned website, such as a subdomain or another available domain.
10. Enter the required domain, subdomain or installation path for the clone.
11. Review the cloning settings before starting the process.
12. Start the cloning process and allow WP Toolkit to copy the WordPress installation.
13. Wait for the cloning process to complete before accessing the new website.
14. Open the cloned website and confirm that the WordPress installation is working correctly.
15. Use the cloned website as a staging or development environment as required.
Additional Information
- A cloned website is separate from the original WordPress installation, so changes made to the clone do not normally affect the original website.
- Cloning is useful for testing plugin, theme and WordPress updates before applying them to a live website.
- You should check the destination carefully before creating a clone to avoid placing it in an incorrect location.
- A cloned website may contain the same content and data as the original website, so access to the clone should be restricted where necessary.
- Search engines should generally be prevented from indexing development or staging copies of a website.
- Cloned websites may require separate configuration for email, payment gateways, APIs or other third-party integrations.
- A cloned WooCommerce website should not normally be used to process real customer orders unless the appropriate production settings have been configured.
- Database content is copied as part of the cloning process, so sensitive information may also exist within the cloned installation.
- The cloned website may require its own SSL configuration if it is accessed through a separate domain or subdomain.
- You should remove unused clones when they are no longer required because they can consume hosting resources and storage space.
- Cloning a website is different from creating a backup because a clone is intended to operate as a separate WordPress installation.
- Always test the cloned website after the process has completed to confirm that the website files, database and required functionality have been copied correctly.
Login to Domains.co.za Account
1. Go to the Domains.co.za website Account Login page.

2. Enter your Email and Password and click the Sign In button.
3. You will see the Domains.co.za Dashboard, displaying the Manage Account menu on the left and your Account Information, Account Overview and Open Support Tickets on the right.


